The Very BEST Whole Wheat Bread
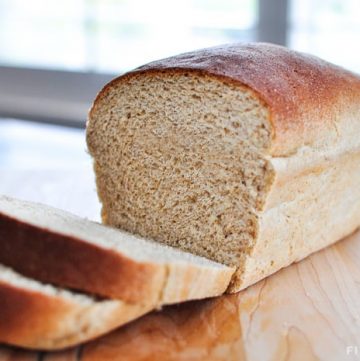
The Very BEST Whole Wheat Bread is the softest, moistest, fluffiest, freshest-staying, homemade, 100% whole wheat bread you've ever tried!

This bread, y'all. This bread. I titled this Whole Wheat Bread recipe "the BEST" and I'm not even exaggerating here. I've baked many a whole wheat bread recipe over the years, and this one is head-and-shoulders above the rest.
Hundreds of raving comments (since I first published this recipe six years ago) can't be wrong...right?! So I decided to update this old post with tons of additional information and tips to help ensure your bread making success!
THE BEST Whole Wheat Bread
Here's the deal...what makes this bread so amazing is that it stays soft and fresh for days after it's been baked.
Just about all homemade bread tastes fabulous fresh out of the oven. But then whatever isn't initially eaten tends to dry out a bit as the days stretch on, particularly in the case of wheat bread.
But this bread is just as good on the third day (if it lasts that long!) as it was on the first. Seriously! I wouldn't believe it if I hadn't experienced it first hand myself. It's like store-bought, stay-soft bread without the preservatives. Forgive me for going all Scarlett O'Hara on you, but as God is my witness, I'll never make another whole wheat bread recipe again!

The Best Whole Wheat Flour for Bread Baking
One of my bread making tricks is that I like to use white whole wheat flour when I make bread. Even though it has the word "white" in its title, this flour is 100% whole wheat.
Traditional whole wheat flour is milled from red wheat; white whole wheat flour is milled from (hard) white wheat. Its lighter grain results in a milder flavor and lighter texture than the whole wheat flour to which most of us are accustomed.
Don't be fooled by the taste, though...white whole wheat flour is unrefined and 100% whole wheat! It's nutritionally the same as its red wheat cousin. I buy King Arthur brand unbleached white whole wheat flour, but I'm sure there are other brands out there that would work just as well.
How to Make the Best Whole Wheat Bread
Not only does this whole wheat bread turn out better than most, but the recipe is actually simpler to make than most! Some of the steps may seem a bit unconventional to an experienced bread maker. But if you give this recipe a chance, I think you'll be pleased with the results.
- Fit your stand mixer with a dough hook. Measure out flour, vital wheat gluten, and instant dry yeast into the bowl and mix until combined.
- Pour in very warm water (between 120°F and 130°F) and mix for one minute. The water needs to be hot enough to activate the yeast but not so hot that it kills it.

 Cover with a clean kitchen towel and allow to rest for 10 minutes.
 - Uncover the bowl.
 Beat in salt, oil, honey, and lemon juice.
 - Add more flour, mixing it in one cup at a time until well incorporated. Allow the dough hook to knead the dough until it becomes smooth instead of sticky and pulls away from the side of the bowl.
 This typically takes 10 to 15 minutes but may take as little as 5 minutes.
 - Grease and/or line your pans and set aside.


- Turn on the oven to 350°F. After exactly one minute, turn it back off. This will preheat the oven to lukewarm...just enough to give your loaves the perfect warm spot to rise!
- Turn the dough out onto a greased surface.
 Divide it equally in half and shape it into two loaves.
 Transfer the loaves to the prepared bread pans, pressing the dough into the corners.

- Place the pans in the warm oven and allow them to rise for 20 to 40 minutes, or until they are nicely domed and as high as you wish your final whole wheat bread loaves to be.

- Once the loaves have risen to your liking, turn on the oven to 350°F WITHOUT TAKING THE BREAD OUT OF THE OVEN. Set the timer for 30 minutes. I know, I know...sounds weird. But trust me.

- Your bread is done when it's golden brown on top with an internal temperature from 190°F to 200°F on an instant-read thermometer. Turn the hot loaves out onto a rack to cool completely.

And that's it. One step at a time...you can do this!
What's a Bread Sponge?
Let's talk about step #2 for a moment, shall we? I believe that the biggest factor that makes this bread stay so soft and fresh is the step in the recipe calling for you to make a sponge. Now I'm not talking about the kind of sponge you keep by your kitchen sink. In bread making, a sponge is a very moist dough that just begins to rise as it gives the yeast a head start. After it's had some time to do its magic, you add more flour and ingredients and proceed with the recipe. The sponge in this recipe only needs to sit for about 10 minutes. But apparently that's all it takes to achieve this bread's wonderful texture.
Ingredient Substitutions
For optimal results, make this whole wheat bread as directed. However, the recipe will still work (and even turn out great) incorporating a variety of substitutes. Just keep in mind that changing the ingredients may result in a different taste and/or texture in your final loaves. Switching ingredients could also require you to tweak an amount or a step, such as needing to add extra flour and/or kneading a bit longer to achieve the proper dough consistency. But if you're willing to experiment a bit, people have had success with the following substitutions...
(NOTE: Many of the below recipe tweaks have been taken from the comment section. I have not tried all of these substitutes myself.)
- Flour. You can make this recipe with regular (as opposed to "white") whole wheat flour. Or you may substitute all-purpose white flour for around half of the whole wheat flour. You may also use freshly ground whole wheat flour (milled from red wheat or white wheat). Just keep in mind that fresh milled flour is much "airier," so you may need to allow it some time to pack down before measuring it out...or just plan on using extra flour, as necesary. Also, with any flour substitution, you may need to slightly adjust the amount of flour added at the end of the recipe. For example, if the dough seems extra sticky and doesn't start pulling away from the bowl in a timely manner, you can work in additional flour (one spoonful at a time) until the texture seems right.
- Vital Wheat Gluten. This ingredient helps whole wheat bread recipes rise, and it encourages soft and chewy loaves with that stay-fresh quality. That being said, if you don't have any on hand or prefer not to use it, many people report having made this bread successfully while leaving out the vital wheat gluten.
- Yeast. I recommend using instant dry yeast (sometimes called "quick rise" or "rapid rise"), as directed in the recipe. You might have success if trying regular active dry yeast...but then again, maybe not. 😉 If you do decide to gamble on active dry yeast, my research indicates that to substitute it for instant dry yeast, you should multiply the amount by 1.25.
- Lemon Juice. If you don't have any lemon juice on hand, you may substitute another type of acid in its place. Orange juice, white vinegar, or apple cider vinegar would all work.
- Honey. You may reduce the honey, if you wish. Also, maple syrup or agave may be substituted for the honey.

Other Recipe Notes
- The stand mixer pictured in this post is a classic, 5-quart, tilt-head KitchenAid.
- You may halve this recipe to make only one loaf of bread.
- You can also make this bread by hand...just prepare your muscles for all of that kneading.
- People have also reported success in halving the ingredients and making this recipe in a bread maker. But I don't own a bread maker and I'm not sure of the specifics...so you may have to experiment on that one. 😉
Avoiding Sticking
The only difficulty that I ran into the first time I made this bread is that it stuck to my loaf pans, despite the fact that I had generously greased them. Nonstick pans are recommended for this recipe, so if you've got 'em, use 'em! But since I prefer baking in my stoneware pans, I figured out a way around not using nonstick.
I grease my pans with coconut oil and then line them with parchment paper, using the coconut oil to adhere the paper to the pan. I find that if I cut a piece of parchment paper the length of each pan and allow it to somewhat stick out the sides, then I only need to cut two small pieces of paper per pan for the ends that remain uncovered. The key is pressing the parchment paper down and smoothing it as much as possible so you don't end up with a bunch of creases in your bread.

How to Store Your Whole Wheat Bread
This recipe makes two loaves, so I like to keep one wrapped (I use Glad Press 'n Seal) and stored in the pantry for eating. The second loaf I keep wrapped up in the refrigerator until we're ready to enjoy it.
I have a bread box, but I still prefer keeping my loaf wrapped inside of the bread box. And when I cut off the first slice, I store that end piece pressed against the cut end of the loaf as a kind of "cap" to help prevent it from drying out. When we're ready for the second loaf, I take it out of the fridge and store it at room temperature in the bread box.
Since this is fresh homemade bread with no preservatives, it will start to mold after several days. So keeping that second loaf in the fridge until we're ready for it buys us some extra time. You could also successfully freeze the second loaf if you prefer. However, we usually eat it soon/fast enough that refrigerating suffices.
If it takes your family awhile to work through two loaves of bread, another winning alternative would be to give the second loaf away! I mean, who wouldn't love the thoughtful gesture of freshly-baked homemade bread?

If you have never baked homemade bread before, I encourage you to try it. It may seem intimidating at first and the various steps do take a bit of time, but overall, it truly is easy. And if you are already an expert baker, then I hope you'll add this recipe to your repertoire!
Now go forth and make bread!
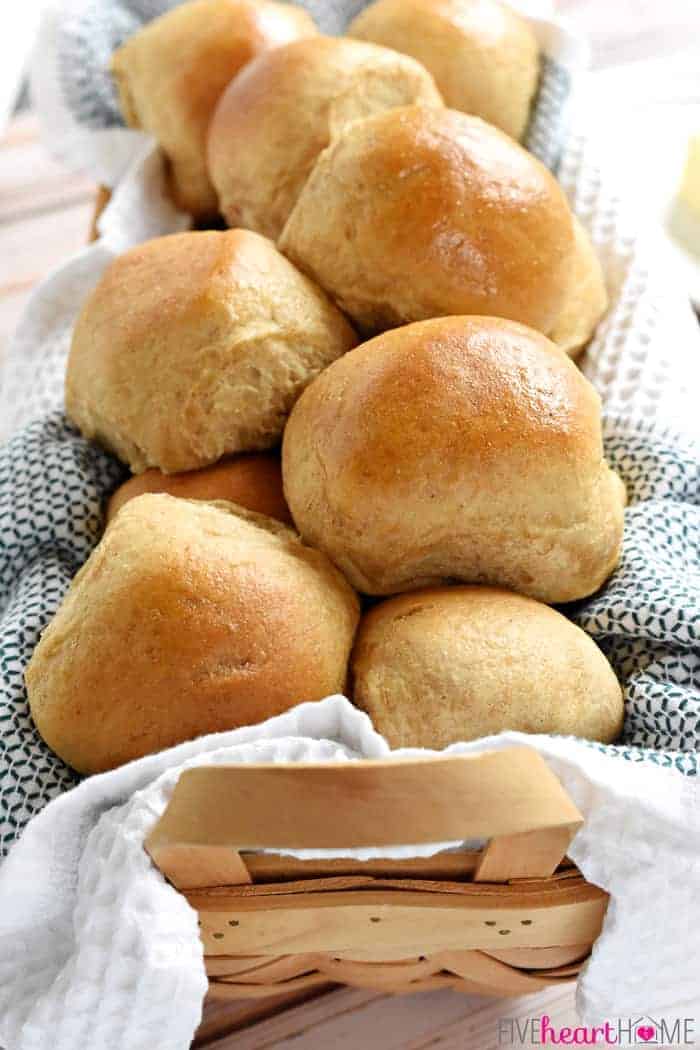
And psssst...if you happen to love this bread recipe, I actually adapted it to make The Very BEST Whole Wheat Dinner Rolls! Your holiday table won't be the same without 'em. 😉
Whole Wheat Bread Recipe
The Very BEST Whole Wheat Bread
Ingredients
Step 1:
- 3 ½ cups white whole wheat flour
- ⅓ cup vital wheat gluten
- 4 teaspoons instant dry yeast, "quick rise" or "rapid rise"
Step 2:
- 2 ½ cups very warm water, 120°F to 130°F
Step 3:
- 1 tablespoon salt
- ⅓ cup coconut oil, melted and cooled (OR vegetable oil)
- ⅓ cup honey
- 4 teaspoons lemon juice
Step 4:
- 2 ½ cups white whole wheat flour
Instructions
- In the bowl of a stand mixer fitted with a dough hook, mix together 3 ½ cups white whole wheat flour, vital wheat gluten, and quick-rise yeast until well combined.
- Add the water and mix for one minute, scraping down bowl halfway through. Cover the bowl with a clean kitchen towel and allow to rest for 10 minutes.
- Uncover the bowl and add the salt, oil, honey, and lemon juice. Beat for 1 minute.
- Add the remaining 2 ½ cups of flour, one cup at a time, mixing well between each cup. Knead the dough in the mixer (still using the dough hook) until the dough pulls away from the sides of the bowl and feels smooth rather than sticky. This usually takes 10 to 15 minutes, but if your dough pulls away and loses its stickiness sooner, it could take as little as 5 minutes.
- Grease two nonstick bread pans measuring 8 ½" x 4 ½" x 2 ½" to 9" x 5" x 3" each (or grease two regular bread pans and then line them with parchment paper). Preheat the oven to lukewarm by setting it to 350°F and then turning it back off after exactly 1 minute.
- Turn the dough onto a greased surface. Evenly divide it into two loaves. Form and place the dough into the prepared bread pans, gently pressing it into the corners.
- Place the pans in the warm oven and allow them to rise for 20 to 40 minutes, until the dough is nicely domed above the tops of the pans. Without removing the pans from the oven, turn on the oven to 350°F and set the timer for 30 minutes. The bread is done when the tops are golden brown and the internal temperature reaches 190°F to 200°F on an instant-read thermometer. Once the loaves are baked, immediately remove the hot bread from the pans to cool on a rack.
Equipment Needed
Notes
- I use coconut oil in this recipe. It works wonderfully and doesn't make the bread taste like coconut at all. However, you may use sunflower, safflower, or another light-flavored vegetable oil, if you prefer.
- Kneading and rising times are approximate and depend on many different variables. The dough must be kneaded until it pulls away from the bowl and is no longer sticky, even if that takes shorter or longer than 10 to 15 minutes. Also, the dough should be allowed to rise in the pans until it is as high as you want your final bread to be.
- White whole wheat flour is 100% whole wheat flour that yields a lighter taste and texture than regular whole wheat flour.
- Other types of flour (regular whole wheat flour, all-purpose white flour, freshly milled wheat flour, etc.) may be substituted for the white whole wheat flour in this recipe. Just keep in mind that the final flavor and texture of the bread may turn out different. Also, if you use an alternate flour (particularly freshly milled flour, which can be less dense), you may need to slightly adjust the amount of flour added at the end of the recipe. For example, if the dough seems extra sticky and doesn't start pulling away from the bowl, you can work in additional flour, one teaspoon at a time, until the texture seems right.
- If you don't have any lemon juice on hand, you may substitute another type of acid in its place (such as white vinegar or apple cider vinegar).
- Vital wheat gluten helps whole wheat bread recipes rise and yield soft and chewy loaves. That being said, if you don't have any on hand or prefer not to use it, many people report having made this bread successfully leaving out the vital wheat gluten.
Nutrition
Recipe adapted from Deals to Meals.
Post originally published on July 8, 2013.


I made this earlier this week and it was fabulous! Thoughts on whether or not this can be done in the breadmaker and still yield such a great texture??
Hi Colleen! I'm so glad to hear that you enjoyed the bread! I agree that the texture is the best part. However, I feel like that's attributable to the sponging step, and I'm just not sure if/how you could replicate that in a bread maker. The only idea I have that might (or might not!) work is to do the first step (mixing the flour, wheat gluten, yeast, and warm water) in a bowl using a mixer, and allow it to rest 10 minutes per the directions. Then layer the rest of the ingredients in the bread maker pan as usual, using the "sponge" as your liquid ingredients, and let the bread maker do the mixing, kneading, and baking for you. Of course, you will definitely have to cut this recipe in half (at least) to get it to fit in your bread maker. I honestly don't know if this idea would even work, but it's the only way I can think to get the sponging step in there using a bread maker!
Thanks so much for the question! If you end up trying this recipe in a bread maker, please come back and share how it turned out. Have a great weekend! 🙂
Love this bread! Have you tried freezing the unbaked dough? What step should I freeze at, between 2 & 3?
Great question, Meaghan! Unfortunately, I have no experience freezing unbaked dough so I can't give you any advice on that. But I did find some helpful information in this link:
http://www.thefreshloaf.com/node/5100/freezing-bread-dough-bake-later
Good luck! I hope you can find the info you need, and if you're successful, I hope you'll come back and share your secret!
Your bread came out lovely... and it seems easy ... As Stephanie pointed out the difference in yeast, can you please let me know which brand yeast you used, an amazon link would be even better, it shows me what exactly you used... I am a novice at bread making, and tried another easy recipe last week, but i think I messed up on the type of yeast.. the bread was very flavorful, but very dense, and the dough had not risen as much I would have expected!
Hi, Deepti! I've been using a jar of Red Star Quick Rise Yeast when I make this recipe, which looks like this:
http://www.amazon.com/Red-Star-Quick-Yeast-Ounce/dp/B00CHTV5B0/ref=sr_1_8?ie=UTF8&qid=1381528585&sr=8-8&keywords=red+star+quick+rise+yeast
I'm pretty sure that I've also used Fleischmann's RapidRise yeast in the past, so that should work as well. It just depends on what I can find at my store.
Hope this helps! Good luck!
Have you tried making this by hand? Do you have any instructions on how one might do that? The bread looks beautiful by the way!
Hi, Joanna! I have not tried making this by hand, but I'm sure it can be done. You would just have to mix everything by hand and then knead by hand. It would take a lot of muscle power and probably extra time to get the dough to the right consistency for each stage, and when you first start kneading it's likely going to seem like a sticky mess. But if you're patient and persistent and don't mind the arm workout, it should work just fine to make this without a stand mixer!
Good luck! I hope you'll come back and let us know how it turned out if you end up attempting this recipe by hand!
Hi! I just found this recipe and would love to try it, but I'm not ready to tackle making it by hand. I have an old breadmaker and would like to try making whole wheat bread. Would I use the same recipe in the breadmaker? Thanks!
Hi, Molly! I have not made this recipe in a bread machine so I can't make any guarantees about the results, but you could definitely give it a try! I would cut the recipe in half, because I don't think a bread machine could handle the full 6 cups. And since you probably can't replicate the "sponging" step with a bread machine, I would guess that your bread may not end up quite as moist and stay-fresh as if you followed this recipe exactly. But I'm willing to bet it would work and still taste good! If you try this recipe in a bread maker, I hope you'll come back and let me know how it turned out. 🙂 Thanks so much for the question...have a great week!
I'm dying to know if Molly ever tried the bread maker. I don't have the energy to knead dough!
I'm curious, too, Sonya! My bread maker is broken or I would try it myself! Do you have a Kitchen Aid or comparable stand mixer? That would at least prevent you from having to do any kneading by hand.
If you do decide to try a bread maker, scroll down and look at my reply to Colleen's comment, where I gave her a suggestion for incorporating the sponging step while still using a bread maker. Again, I haven't tried it, so I'm not positive it would work, but it was just an idea. Please do report back if you give this recipe a try in your bread maker! 🙂
Hi, Samantha. Thanks for the bread recipe.
I'm a little bit confused about the oven temperature. You said to set the oven to 350° and then turn it off after one minute. After preparing the pans and putting the dough in them, what is the approximate temperature of the oven when you put the pans back into the warm oven? I know that if it's too warm, the bread will start to bake.
Any suggestions for us on this?
Hi Margie! Sorry if the directions were confusing. I just tested it out for you with my oven. I don't have an oven thermometer in there right now, but when I set my oven to 350°F, the temperature setting initially reads 100°F as it heats up (that's the lowest temperature my oven will show). At exactly one minute, it still said 100°, which tells me it hadn't risen about that temperature yet. (Out of curiosity, I kept watching past the minute mark, and it started rising above 100°F about 20 seconds later.)
So, if you set your oven to 350°F and turn it off after exactly one minute, your oven temperature is probably in the 90° range...warm enough to help your dough rise but not hot enough to start baking it. Hope that helps!
Alternatively, if this makes you nervous, you can preheat to the lowest temp on your oven (usually 170 or 180) and then turn it off.
Thanks for the tip, Laura! 🙂
Hi! I just found your site and can't wait to make this bread. I have been looking for a new recipe. Can I use active dry yeast and if so, what modifications would I need to make to the recipe? Thanks so much!
Hi Stephanie! I haven't tried this recipe with active dry yeast (as opposed to instant/quick-rise), but I'm sure it can be done. I think the bread will just need to rise a bit longer to get to that domed, ready-to-bake point. I found some more specific info for you here under the Can I use active dry and instant yeasts interchangeably? question: http://www.kingarthurflour.com/recipe/yeast.html .
Hope this helps! I'd love for you to come back and let us know how the regular yeast ends up working out for you. Thanks so much for your question! 🙂
Hi Samantha.
This bread looks fantastic. Can we use melted butter instead of oil? And i wanted to make this for my mum, she likes rounded shape bread, can we use the dough to make these?
Hi Shaheen! You should be able to use melted butter just fine. And I imagine that any shaped loaf would work with the recipe, but I haven't personally tried round loaves so I'm not sure what to advise as far as baking time. If you try these changes, please come back and let us know how everything worked out! 🙂 Have a great weekend!
Hello Samantha, Just ran across your recipe for wheat bread. I can't tell you how many tries it took learning to bake bread to turn out a really nice loaf...as I just gave up so many times lol, but I think I have it down now. Though I have never turned out a loaf of wheat bread I really liked, because it always turns out rather dense and heavy. I noticed in wheat recipes you don't let the dough rise twice like you might in white bread. By skipping that first rise, does that give more lift once baking in the pans? Does lemon juice give the yeast an extra boost? Do you recommend dough conditioners? Thanks for your advice, your bread looks like heaven.
Hi John! Despite the popularity of this recipe, I am actually not a bread making expert. 😉 So I'm not 100% sure about why some recipes direct bread to rise once and others to rise twice...that's a really good question! I can tell you that lemon juice acts as a natural dough enhancer, aiding in gluten development and the final height of your bread. Vital wheat gluten also acts as a dough enhancer (improving dough elasticity and bread rise), so I don't think this recipe requires any further dough conditioners. 🙂 Hope that helps, and hope you have a chance to try this bread...have a great week!
CAN YOU USE OLIVE OIL?
Yes, Brenda, olive oil should work just fine! The only reason I didn't mention it in the recipe is that it sometimes has a stronger flavor than some of the more neutral-flavored vegetable oils. Thanks for the great question!
The bread looks wonderful. Is it ok to replace lemon juice with orange juice?
Thanks.
Yes, Chandra...orange juice should work just fine. Any acidic liquid will help create the type of acidic environment that makes the yeast happy. 🙂 Thanks for your question...hope this bread turns out great for you!
Coming back to let you know that this bread is awesome! It came out perfectly and it was so easy to make. Thanks for a great recipe.
I really appreciate you coming back to let me know, Lila Mae! I'm so glad to hear you loved it!
Ooh this looks so good! I have been trying to work up the nerve to try making homemade bread, and this is just the inspiration I need. Thanks so much, Samantha!
~Abby =)
You can do it, Abby! It really is so easy. If you try it, come back and let me know how it turned out!
This looks so good! Whole wheat bread always intimidates me because it seems to turn out like a brick. I'll be giving this recipe a try though!! Thanks for sharing, I found you at the "hungry little girl" party, now following on Facebook, can't wait to see more from you!!
Krista@Far From Normal
I think you'll like the way this bread turns out, Krista...very un-brickish. 🙂 Thanks for the comment and for stopping by!
This bread looks AMAZING. I will surely try this recipe tomorrow
Thanks so much, Kate! I hope this bread turns out well for you and that you love it as much as my family does. I really appreciate you stopping by!
thanks so much for ur detailed recipes.
i just have a question, although i have flatted out the dough and baked it, still it has this bitterness after u eat it. although i have tried a few times, the bitterness doesnt go away. any idea of what i do wrong?
Hi Mohtaram! I'm sorry to hear that your bread is turning out bitter for some reason. I've never had that problem, so I'm not sure what to suggest. It sounds to me like it might be an issue with your ingredients...perhaps the type of flour you're using? I apologize that I can't be of more help. I hope you figure out what's causing the problem!
I have the same problem when I make w.wheat bread, it always has a slight bitter taste. Unfortunately in Canada we can not get White Whole Wheat flour, so I've given up on making it and stick to mostly white flour with a portion of W.wheat flour added. Disappointing, as I would love to make 100% w. wheat bread.
It's too bad that you can't get white whole wheat flour in Canada, Dale...hopefully that changes at some point! In the meantime, I hope you enjoy this recipe using white and whole wheat flour combined. 🙂
I've heard that if you substitute a little orange juice for a little of the water it cancels out the bitter taste of whole wheat flour. I have a one loaf recipe for whole wheat bread from the King Arthur flour website that recommends exchanging 1/4 cup orange juice for 1/4 cup water. This is a two loaf recipe so you might try substituting 1/2 cup. I like the taste of whole wheat so haven't tried it, but it might work.
That's a great tip, Aimee..I've never used orange juice in this recipe, but I'll have to try it sometime and see if it makes a difference. Thanks for sharing!
Whole grains can go rancid. They don't have the shelf life of white processed flour. If you confused it often keep tightly sealed in your freezer. Might help. Good luck.
Thanks so much for sharing your tips, Patti! 🙂
Ok, so I made this last night. I do not have the best bread hands, so it wasn't as pretty as yours...but, IT. WAS. AMAZING. So amazing that I made myself a grilled cheese for lunch today and took the extra loaf to my neighbor (because I am so domestic and all). I've made lots of bread before, but this one was just so simple and fast...nothing like the other recipes I've tried. Thank you for sharing! Eagerly awaiting your next post.
Carmen
That makes me so happy to hear, Carmen. Thanks for sharing!
Visiting you from Adventures of a DIY mom.
This bread looks amazing. I have pinned it
All the best
Keren (from fabulous-farmliving)
Thanks for stopping by, Keren!
I have been looking FOREVER to find a bread that will stay soft and fresh over time. Thanks for sharing it. I just printed it out - I'm hoping to try it this week. Also pinned!!
I hope you love it, Rachel. Every time I make it, I'm amazed at how soft it stays!
Do you know of any tips or adjustments for high altitude baking in Colorado?
Hi, Stephanie! I'm so sorry, but I don't have any experience with high altitude baking. I hope you're able to find some tips to help you make the necessary adjustments to this recipe...good luck! 🙂
I love homemade wheat bread. This loaf looks gorgeous!
Thanks, Jenn! If you love homemade wheat bread, you should definitely try it!
Hi there! Would you recommend this recipe for making ww hamburger buns?
Karen
Hi Karen! I've never tried this recipe in any form other than loaves, so I'm sorry to say that I'm not sure how it would translate to hamburger buns. But I imagine it would work just fine. You'd just have to figure out the rise time and bake time, perhaps using another WW bun recipe as a starting point? Good luck if you give it a try, and please come back and let us know how it turns out! 🙂
I have been looking for a perfect WW loaf and now finally have it. I am not sure if I measured wrong (aka forgot to count something) but I had to add an extra cup of flour at the end so it wasn't so sticky. I also just floured the pans after greasing them instead of parchment paper and the loaves came out perfectly.
I also did only one loaf and the other half made into hotdog buns. They were perfect. I am sure burger buns would work just fine as well.
I'm glad that this recipe was a success for you, Radha, even after a few adjustments! And what a great idea to use the dough to make hot dog and hamburger buns...I'm going to have to try that sometime! Thanks for sharing...happy Friday! 🙂
Yes, this recipe makes fantastic hamburger buns! I divide my dough in half, making one loaf of bread and eight hamburger buns. They are divine sliced, buttered, and grilled--yum!
I bet those are the best burgers ever, Tonia! 😉
Hi Samantha,
Thanks so much for featuring our printables! This bread looks delicious... and the photos are fab too!
x
You're welcome, Trisha, and thanks for the kind words...I'm sure my readers will enjoy the printables!
This is the best semi-wheat bread recipe I've tried, but here's some tips of my own to make it even better and faster.
If you have a double oven, heat up a half gallon of water in a pan that will fit under your lowest rack. Get it boiling since the temperature should be the hottest for this trick. In the meantime, assemble all of the ingredients, combine and knead for at least eight minutes. Put the ball of dough in a bowl that will hold it when it doubles in bulk. Put the bowl in the oven on top of a cookie sheet (this is important since you don't want the heat to be concentrated under the bowl). Put the pan of hot water under the cookie sheet and let the dough rise. This method cuts in half the amount of time it takes to rise. After the dough is risen, punch it down, cut the dough in half and roll it out with a rolling pin. In its flatten state, sprinkle processed oats on the top of the dough. Roll it up, pinch the ends and stretch the dough to fit inside the bread pan. Put the pans back in the oven, reheat the water in the pan and place it under the cookie sheet. This process will also shorten the time it takes to rise the dough. In the meantime, heat the other oven to 450 degrees. When the dough goes past the top of the bread pan, put it into the oven. Immediately lower the temperature to 375 degrees. Let it bake for whatever time it takes (I live at 6000 feet of elevation, so it take a little longer to bake the bread). When the top of the loaf begins to brown, take it out of the bread pan and place it on the oven rack so that the entire area becomes browned. Tap the loaf on the bottom to determine that its done.
That's it! The time to bake these loaves is shortened by 30 minutes and they come out just as perfect as the picture presented on this blog.
What great tips, John...thank you for sharing your wisdom! I'm sure others who decide to try this recipe will find your advice useful. 🙂 I'm curious, however, as to why you referred to this recipe as semi-wheat? It uses only 100% whole wheat flour. Anyway, thanks so much for your comment and I hope you have a fantastic weekend!
My guess would be because its White whole wheat which has less nutrients than whole wheat. I am in LOVE with this recipe and I grind my own wheat so it is a WHOLE WHEAT bread that no one can deny and its the BEST recipe I have found! Thank you soooooo much for this recipe. My kids tell me that it tastes like store bought and coming from them that's a compliment! Again Thank you so much for this recipe I make two loaves a week and so happy my kids are getting whole wheat bread that is good for them!
I'm so glad your family enjoys this recipe so much, Jenny! I don't grind my own wheat, but the White Whole Wheat Flour that I list as an ingredient in this recipe is actually 100% whole wheat. It's just called "white" whole wheat because it's ground from white wheat instead of red wheat. 🙂 At any rate, hope this recipe serves you well for many years to come!
It is 100% whole grain and the nutrients are the same as red wheat whole grain.
Hello what can I use in the place of glutton im allergic this will be my first time making home made bread
Hi Anita! You can leave out the vital wheat gluten and this bread will still turn out great. However, since the white whole wheat flour in the recipe still contains gluten. I don't know how the bread would turn out substituting gluten-free flour, but please come back and let us know if you decide to try it. 🙂