The Best EASY Butter Pie Crust (Foolproof…YOU Can Do It!)
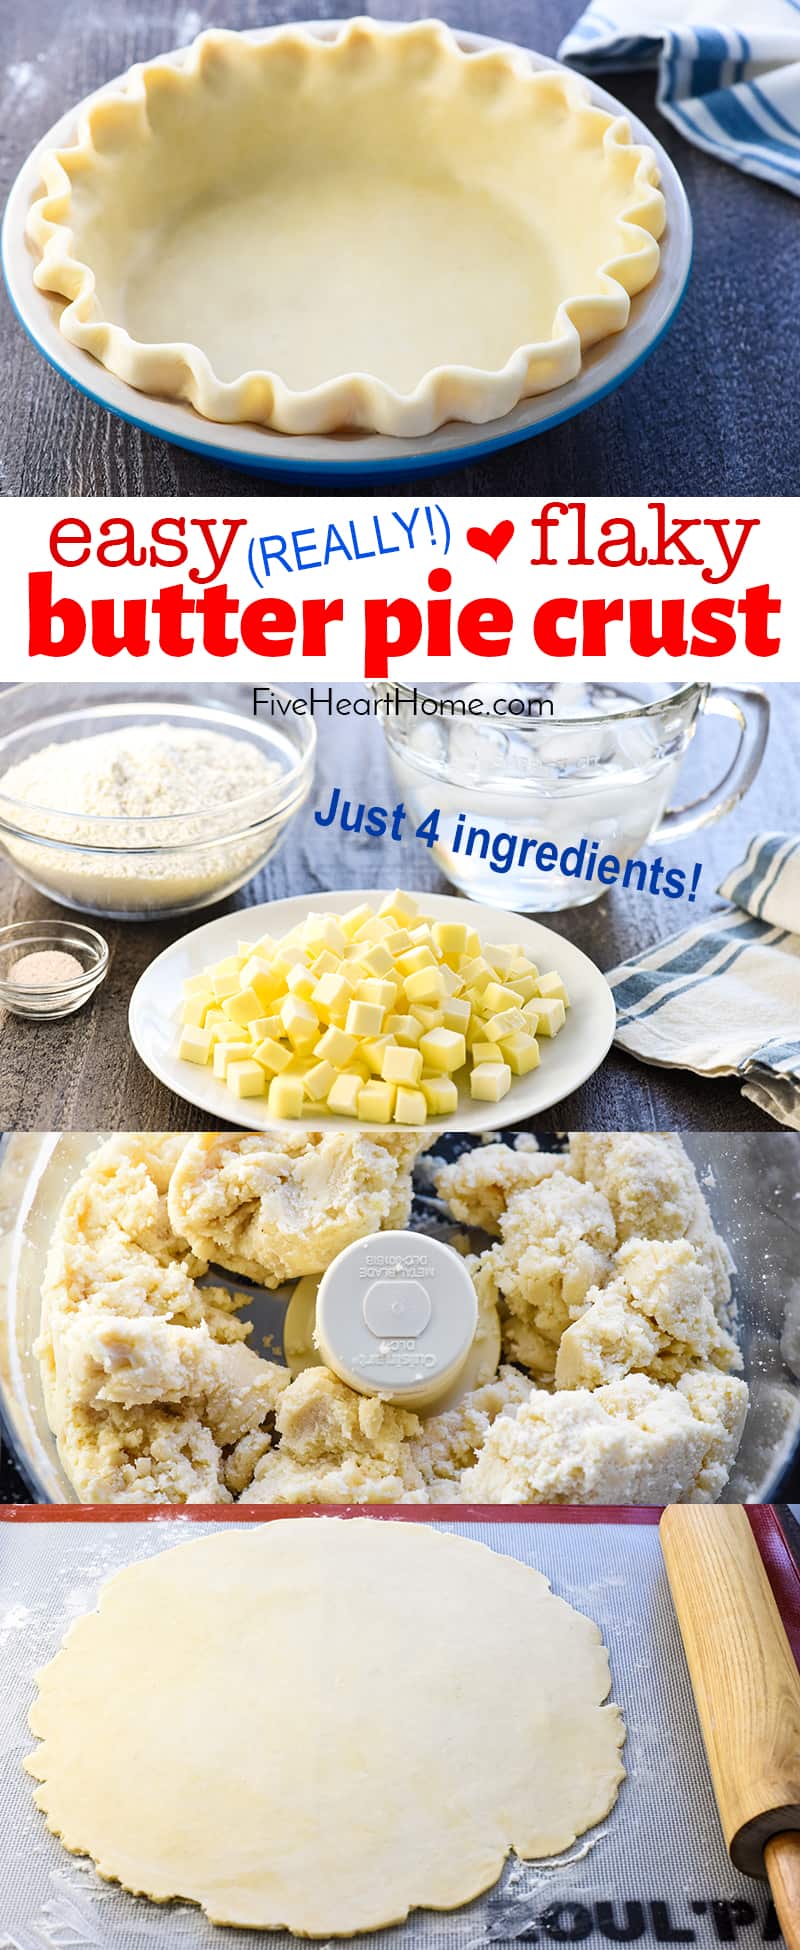
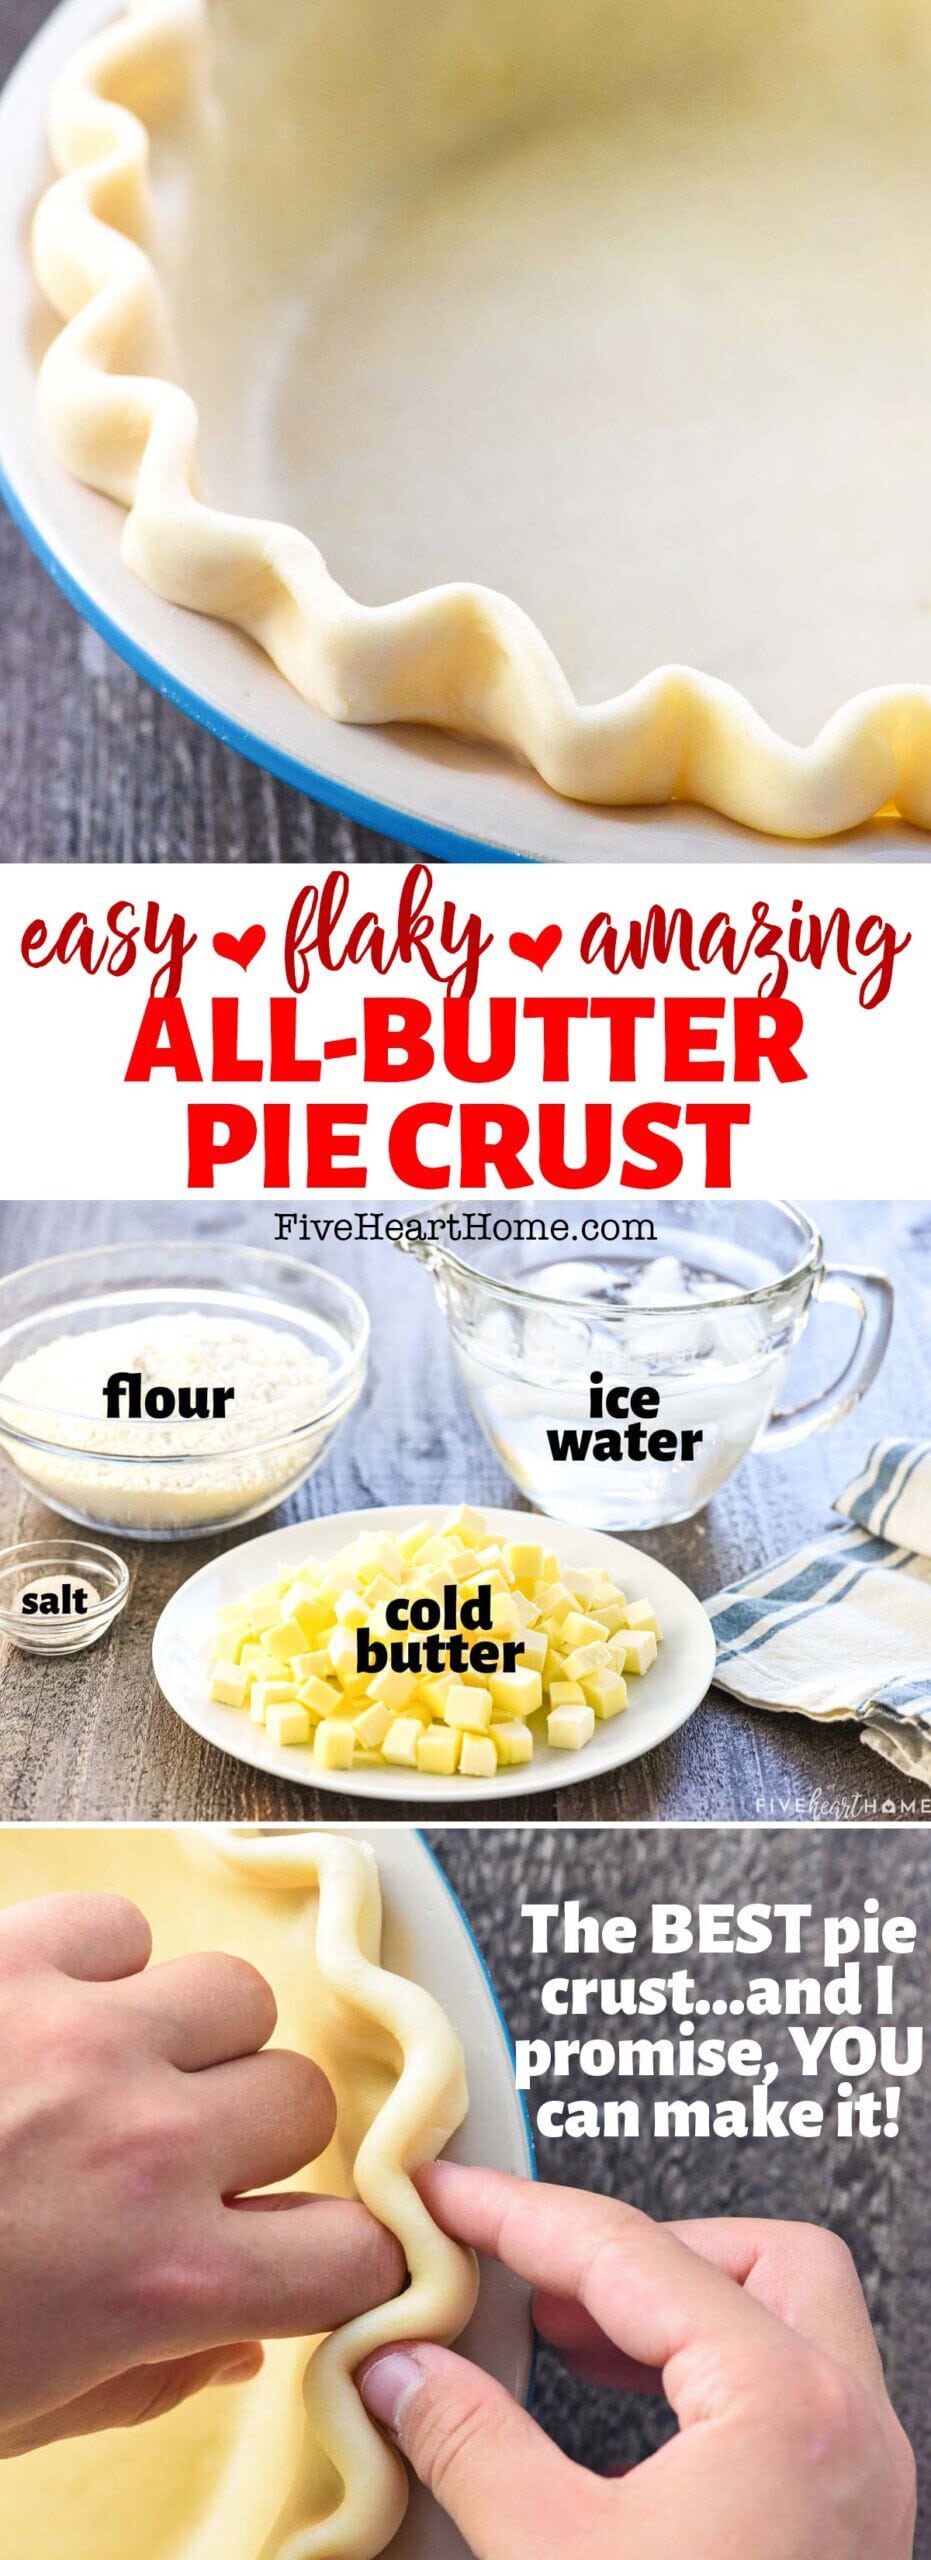
This Butter Pie Crust is homemade, easy to make with just FOUR simple ingredients, and amazingly flaky and delicious! It’s truly foolproof (even if you’re not already a pie crust expert) and the ONLY pie crust recipe you’ll ever need…hundreds of rave reviews can’t be wrong!
Pie crust is one of those things that many people are intimidated to make from scratch. Believe me, I get it. I used to be right there, too, thinking that my best option was to buy a frozen or refrigerated pie crust every time I wanted to make a pie.
But several years ago, I decided to face my pie crust phobia head-on. I mean, what could be so difficult about flour, salt, butter, and water? If Marie Callender could do it, by golly, so could I! 😉
And the verdict?
Y'all. Making your own pie crust recipe really is easy. On top of that, the flavor of this flaky, homemade Butter Pie Crust far surpasses anything you can buy pre-made!
And yes, I am firmly in the all-butter pie crust camp. I know that vegetable shortening has its merits when it comes to pie crust, but it's an ingredient that I prefer to avoid when possible. So I've found that I can get a perfectly flaky, flavorful crust using only butter! But it does involve a few tricks.
Secrets to an All Butter Pie Crust
There are two secrets to success when making a flaky pie crust recipe:
- Cold ingredients. And...
- A food processor! That's right, folks, I let the food processor do the grunt work for me.
The key is starting with ice-cold butter and water. And just as importantly, you need to keep the ingredients cold by working them quickly and not using your hot little hands more than necessary.
The reason? Because once your dough is all rolled out and popped into the oven, those still-intact pieces of cold butter will melt and steam and burst, creating little air pockets that yield the flakiness in your pie crust. That doesn't happen if all of your butter has already melted into the dough before hitting the oven.
Can You Make a Pie Crust Without a Food Processor?
Now if you don't have a food processor, you can certainly achieve the best pie crust recipe without one. After all, I don't think our grandmothers relied on a Cuisinart. 😉
You'll just have to cut your ingredients together using a pastry blender or cutter and then use a spatula to work in the water.
It takes a bit more elbow grease and patience, but making your homemade pie crust by hand can still yield great results.
Alrighty now, enough chit chat. Let's get on with our Butter Pie Crust making, shall we?
Ingredients
It's hard to believe that such a flaky, tender, melt-in-your-mouth, all butter pie crust starts with just FOUR ingredients:
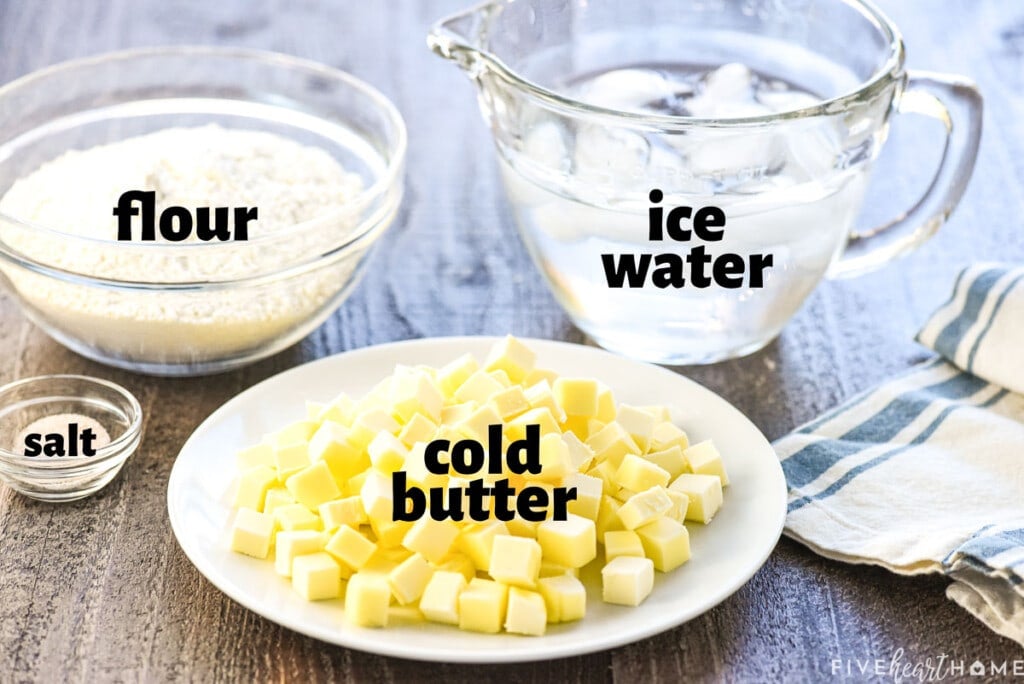
- Unsalted butter. It needs to be very cold! And if you only have salted butter, you'll need to slightly decrease the amount of salt that the recipe calls for.
- All-purpose flour. Be sure to fluff your flour and then level off the top for accurate measuring.
- Salt. I use fine sea salt in just about every recipe I make and it works well here, too.
- Ice water. Once again, extremely cold ingredients are of utmost importance!
How to Make Pie Crust
(The below photos are intended to be helpful, but please refer to the recipe card at the bottom of this post for FULL DIRECTIONS.)
Hopefully these step-by-step photos will show you just how easy homemade pie crust really is. Don't be intimidated!
- Start by dicing your butter into small cubes and then popping 'em into the freezer for a while. You want your butter to be nice and cold, even partially frozen.
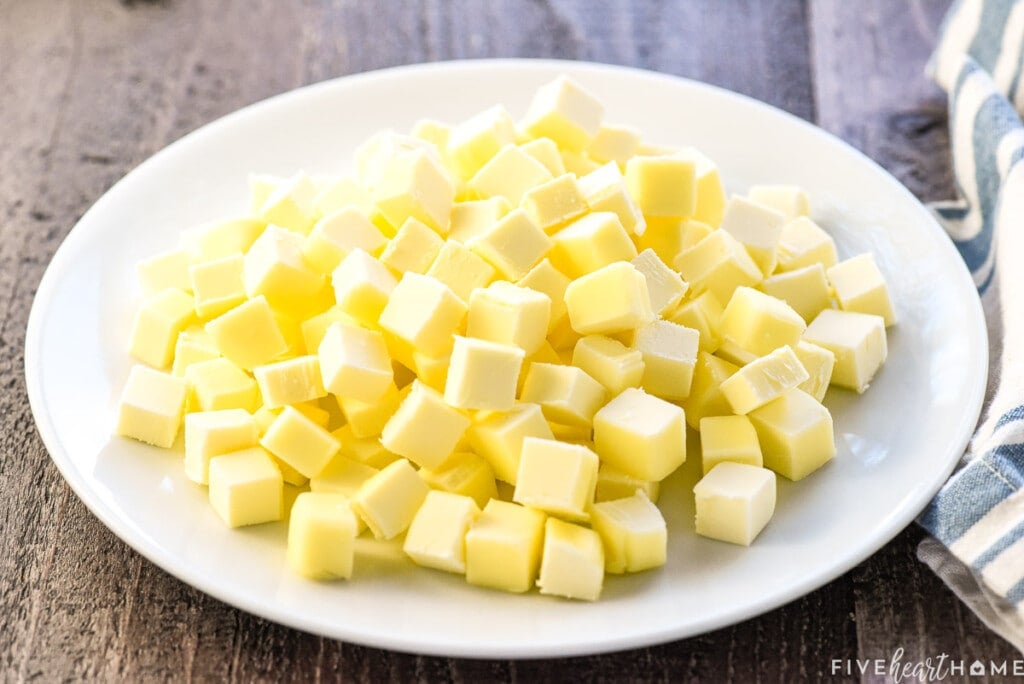
- Next, measure your flour and salt into the bowl of your food processor, and dump the butter on top. I like to make sure my cubes of butter are fairly broken up and not all clumped together when I do this.
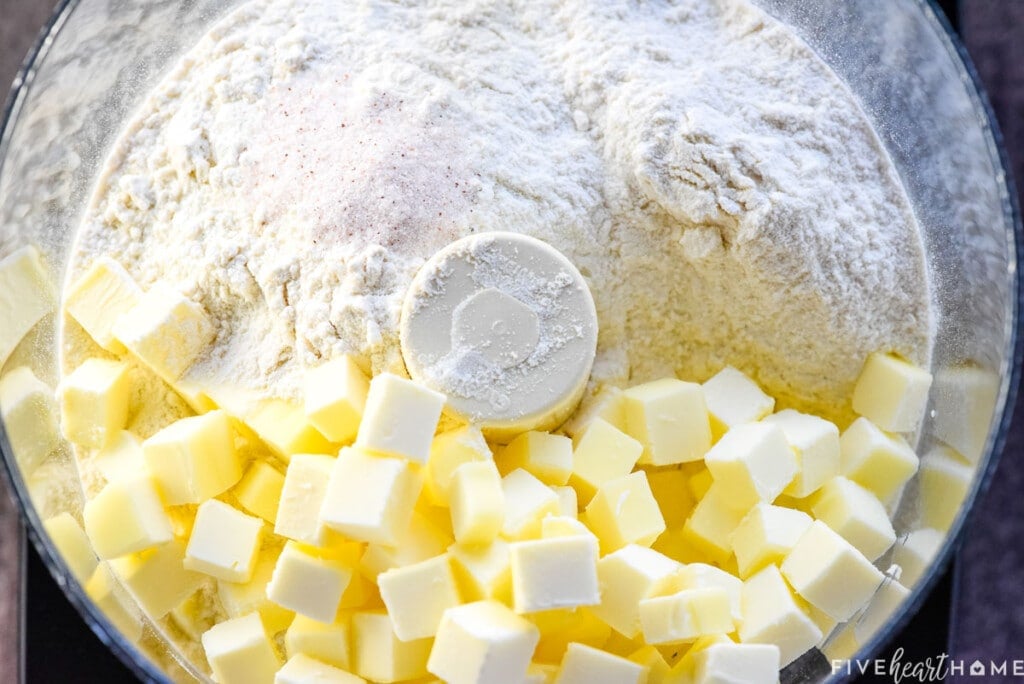
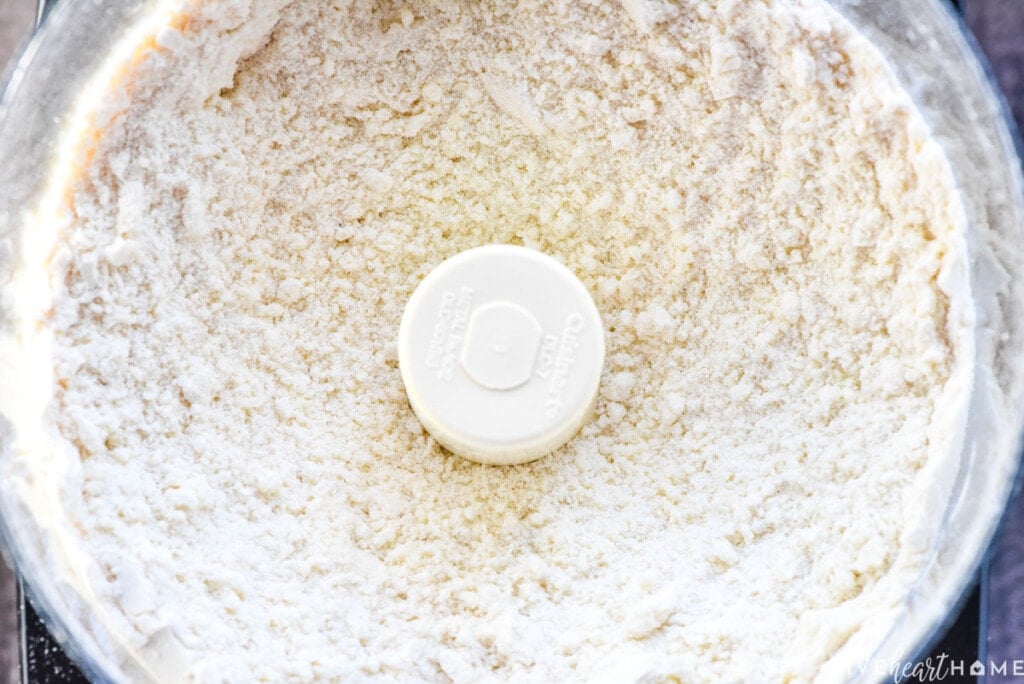
- Pulse the mixture until it resembles coarse, sandy crumbs. It's preferable for there to be some recognizable bits of butter remaining, but they shouldn't be larger than pea-sized.
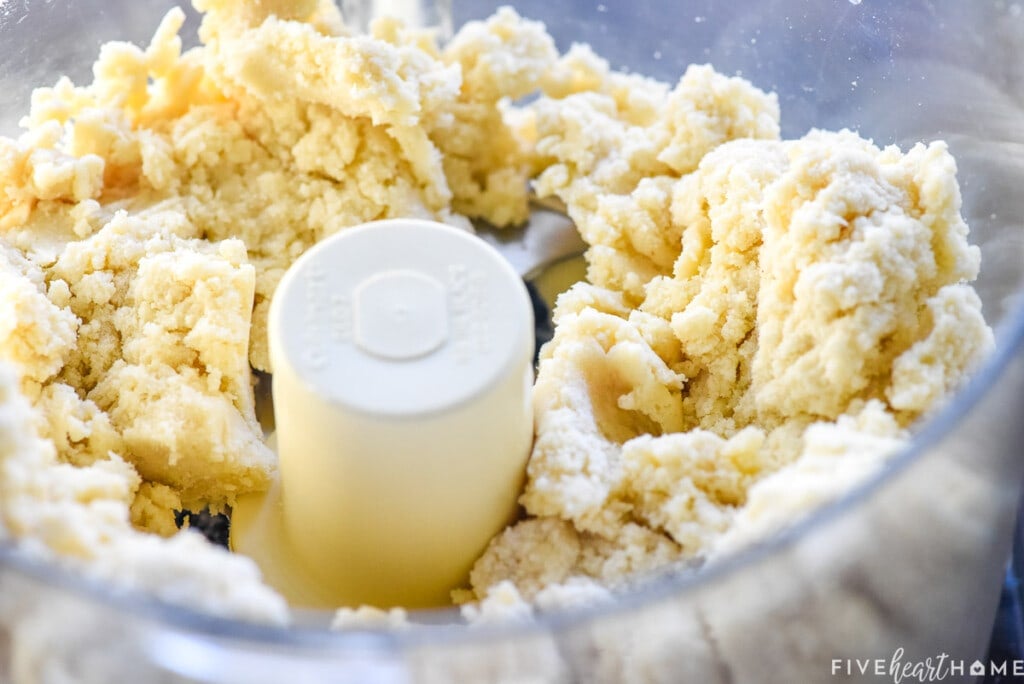
- With the lid of the food processor on, pour 1 tablespoon of ice water through the feed tube and pulse a few times. Repeat this step, pulsing between each tablespoon of water until the dough starts clumping together and pulling away from the sides of the bowl. Be careful not to add too much water! Eight tablespoons is usually just right for me, but you could require a tad more. Just pay attention to your dough and stop before it gets too wet. If it does get too wet, you'll want to quickly pulse in an additional spoonful of flour.
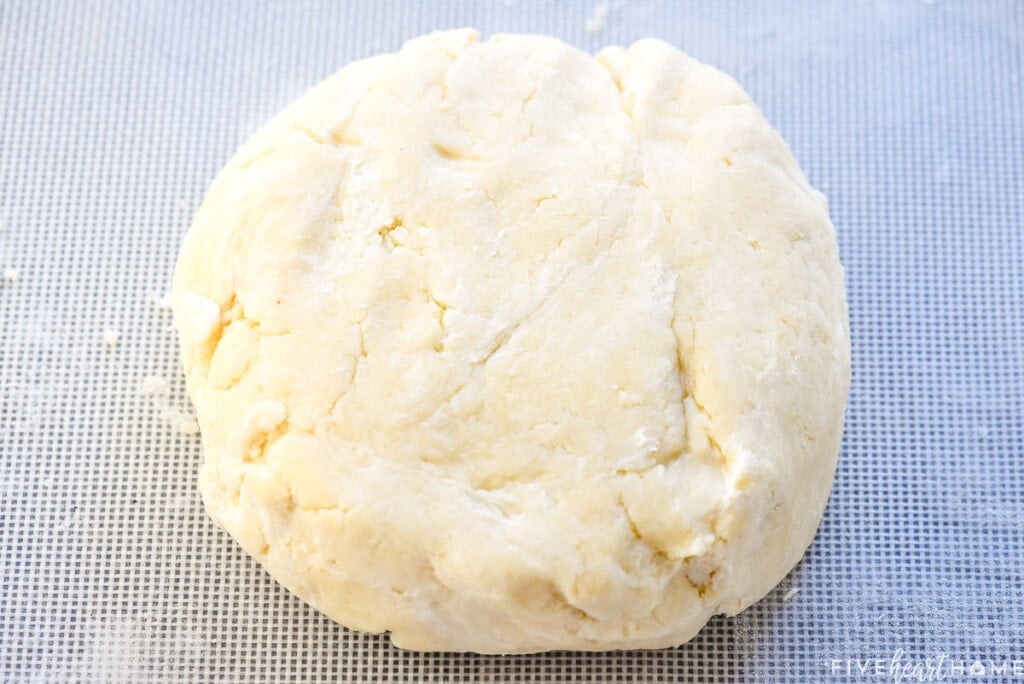
- Once your dough has reached the right consistency, dump the mixture onto a large cutting board or silicone mat or clean countertop.
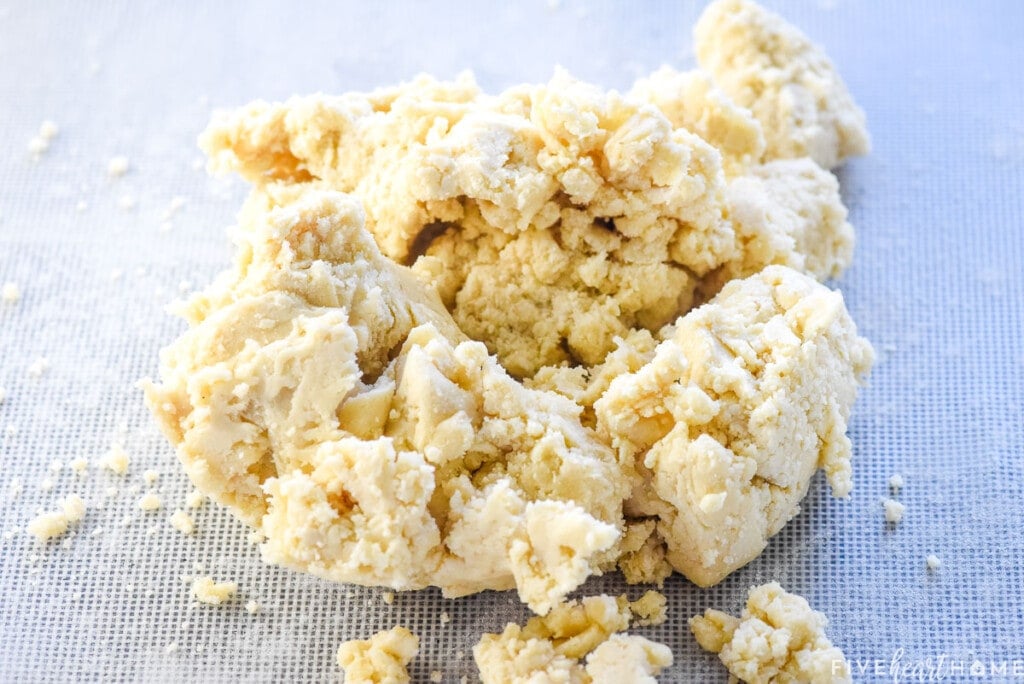
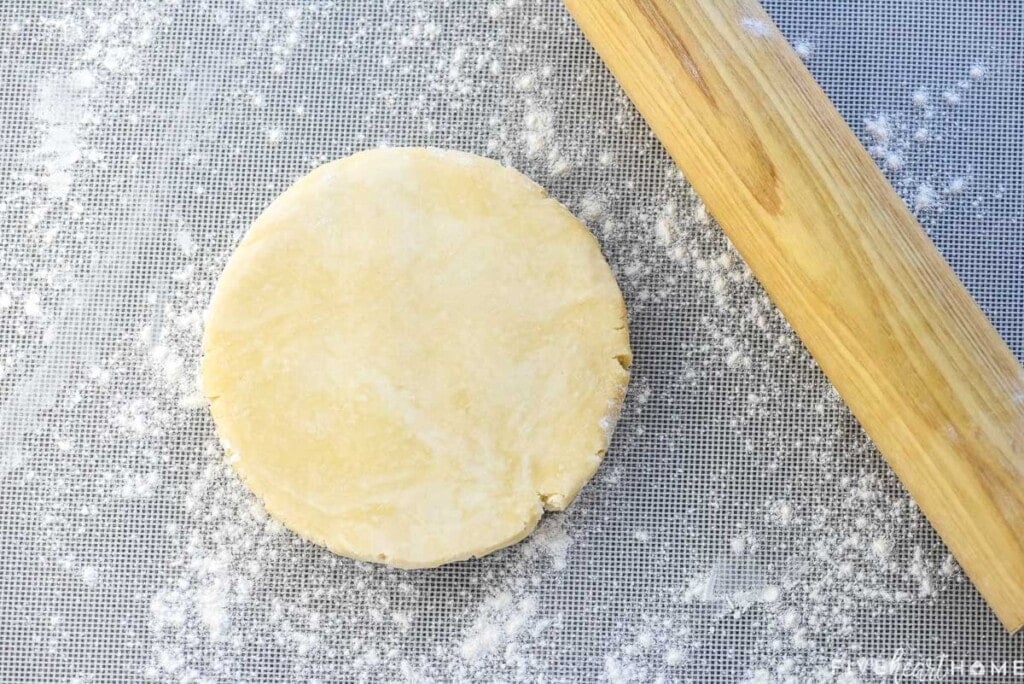
Form it into a lump...
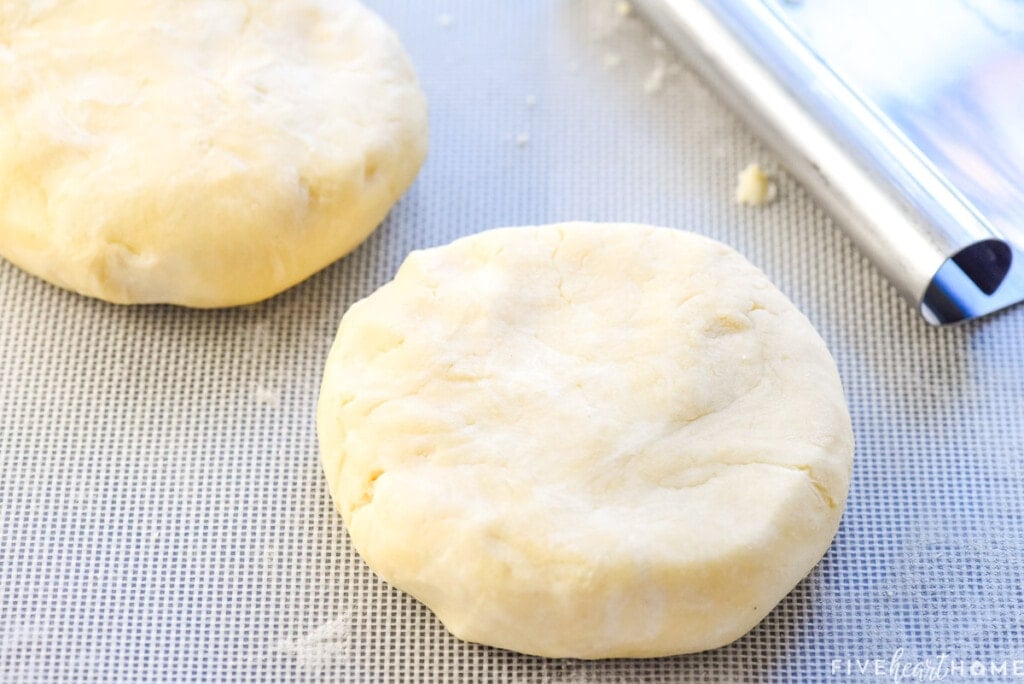
...and divide it in half.

- Quickly form the halves into two balls and then flatten the balls into disks. Remember not to overwork the dough with your hands...you don't want to warm the dough and melt the butter!
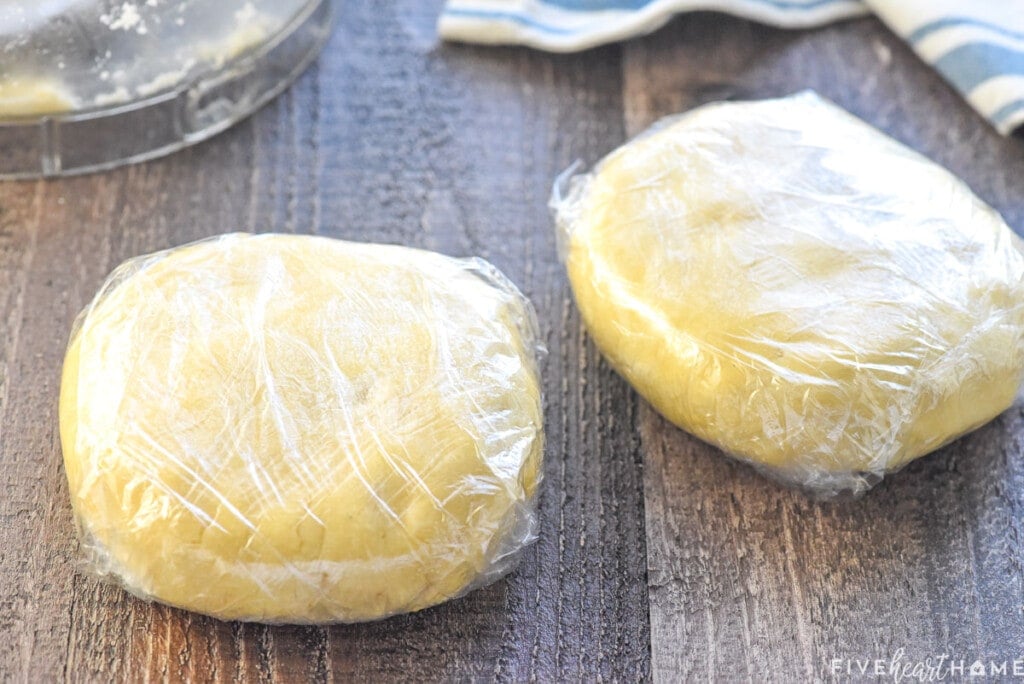
Place each disk of dough in a plastic baggie (or tightly wrap in plastic wrap) and put them in the refrigerator for at least an hour and up to 4 days.
Rolling Out Your Pie Crust Recipe
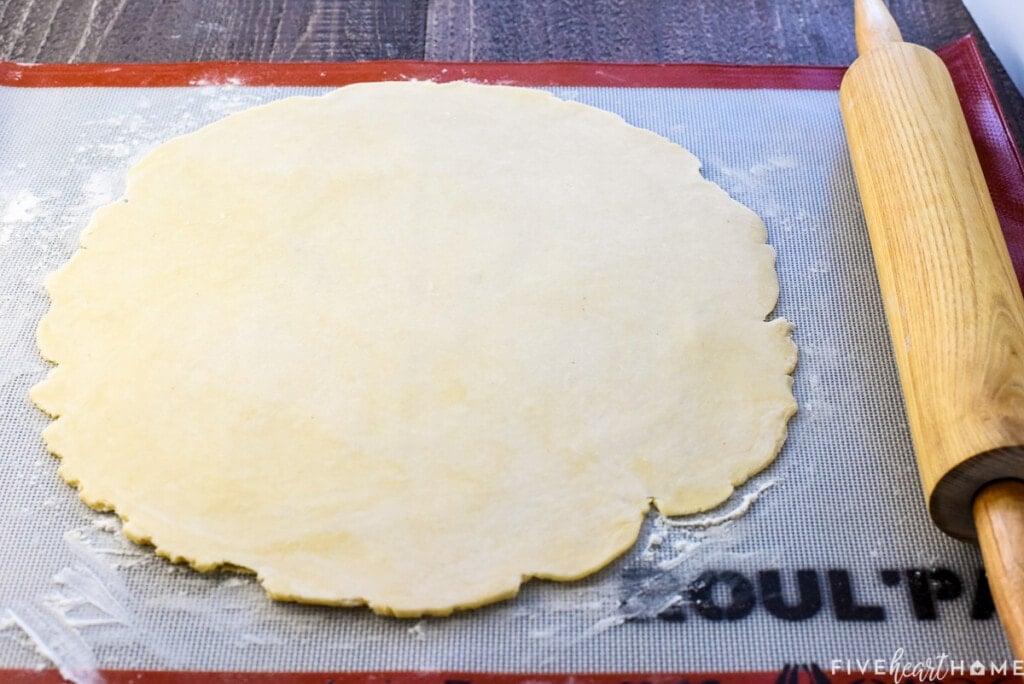
- Once your dough is nice and chilled, take one of the disks out of the refrigerator and let it sit on the counter for a few minutes. You want it to thaw just enough to soften for rolling, but remember…you still want it to stay cold! After chilling, your dough shouldn't be too sticky. However, you'll still need to lightly dust your work surface and rolling pin with flour. Just remember that if you use too much flour, you might end up with a tough pie crust.
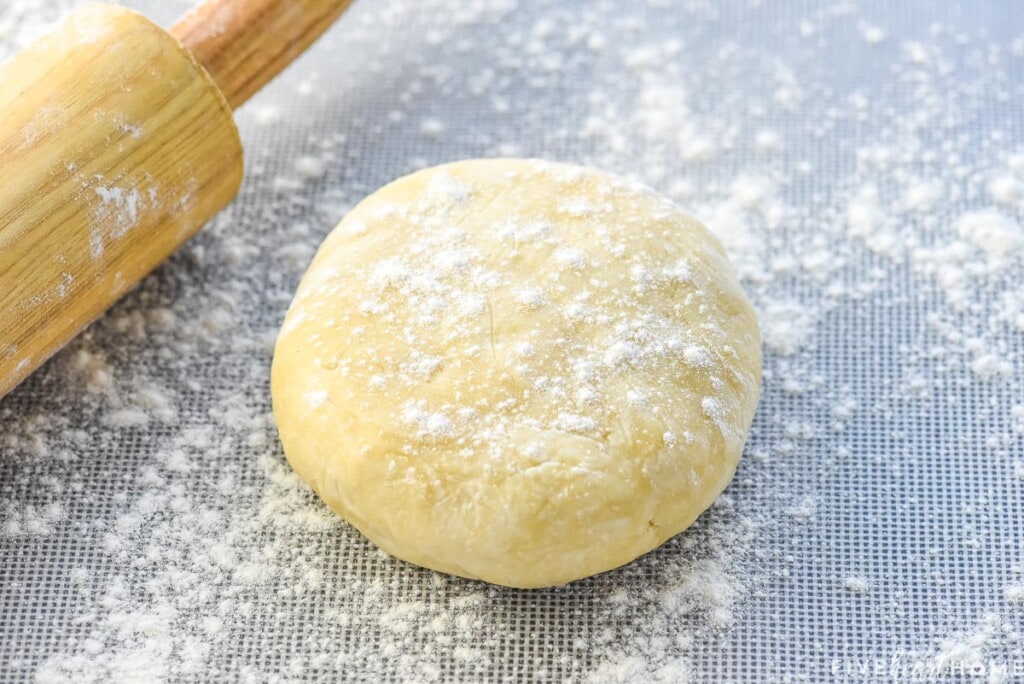
Take your time rolling out your Butter Pie Crust.
- Start at the center and roll outward, turning your dough a quarter turn and repeating until the diameter of the whole crust is about 4 inches larger than the pie pan. If the edges of the crust start to split, pinch them together before continuing.
- Once your crust is rolled out, allow it to rest flat for about five minutes. Then transfer it by carefully rolling it over the rolling pin...
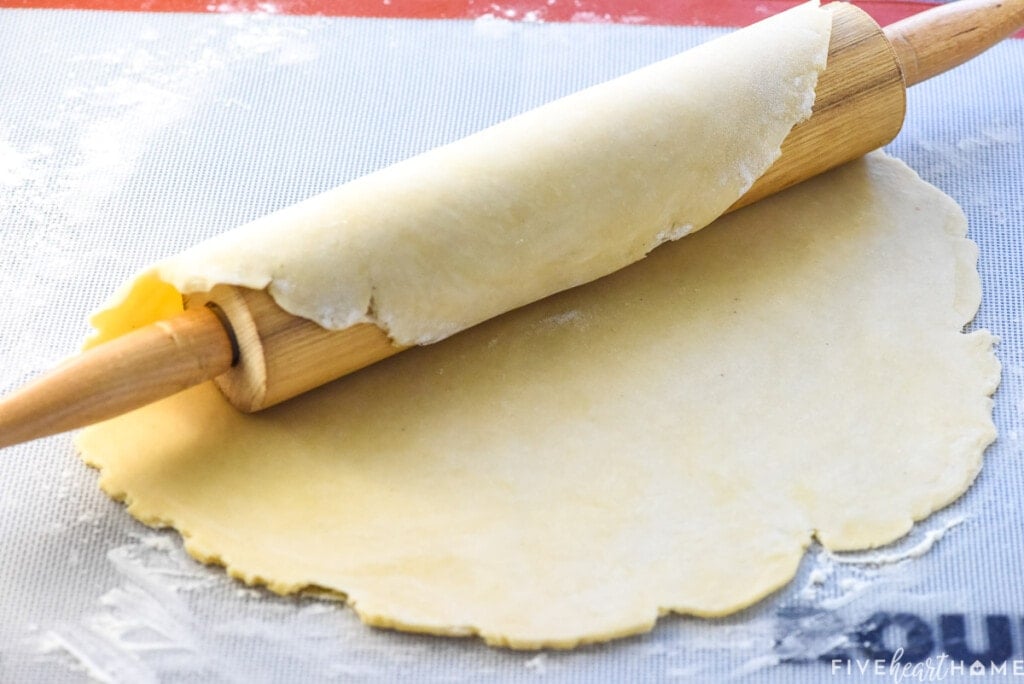
...and then unrolling it evenly over your 9- to 10-inch pie pan

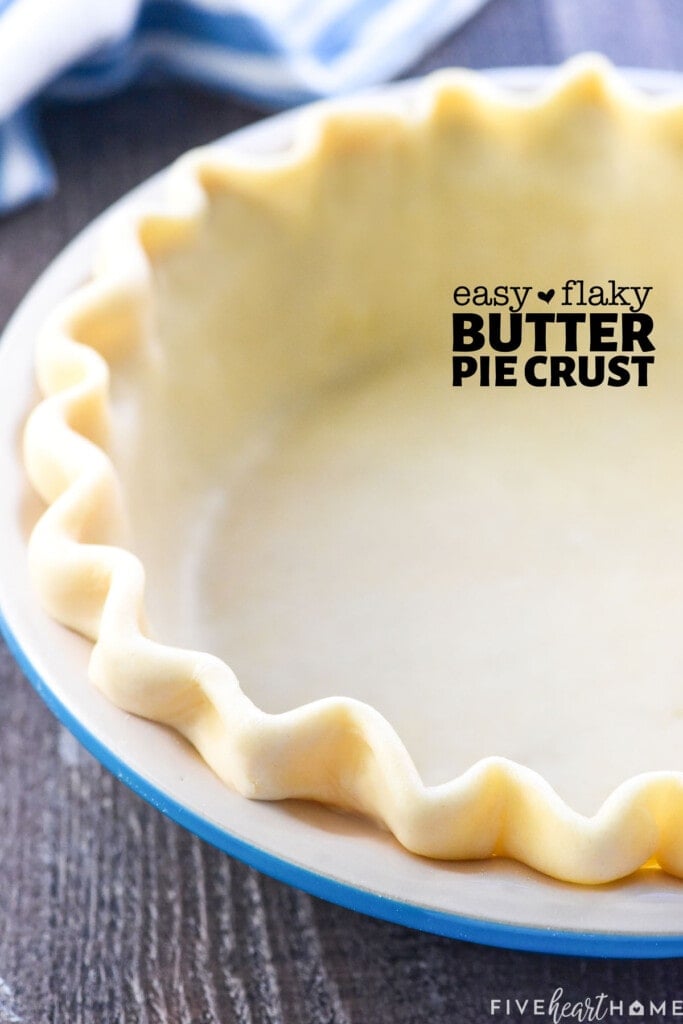
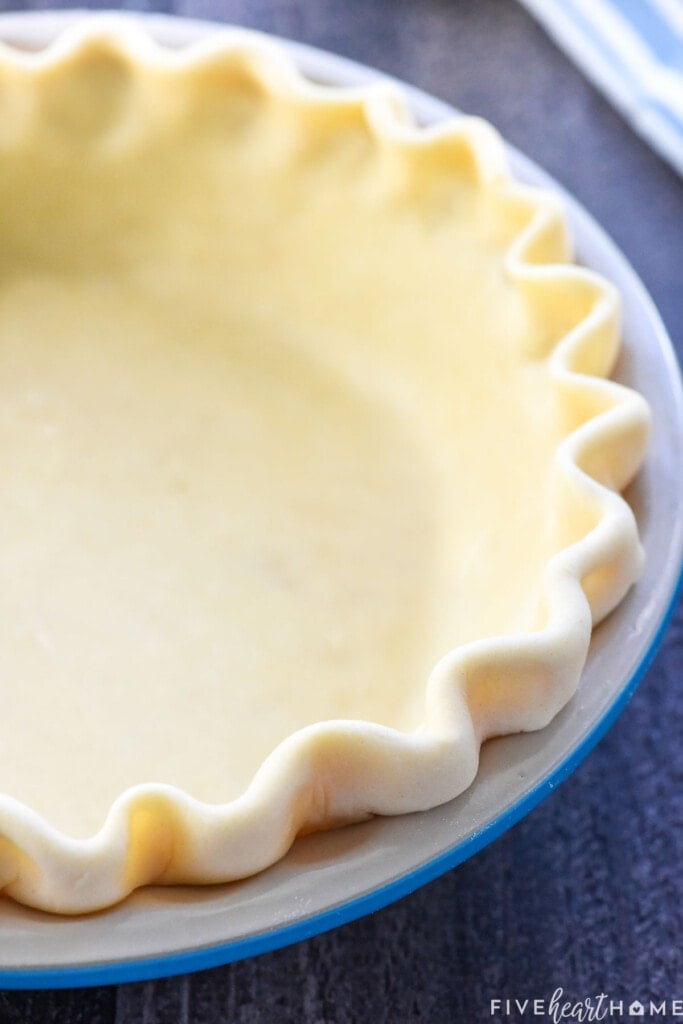
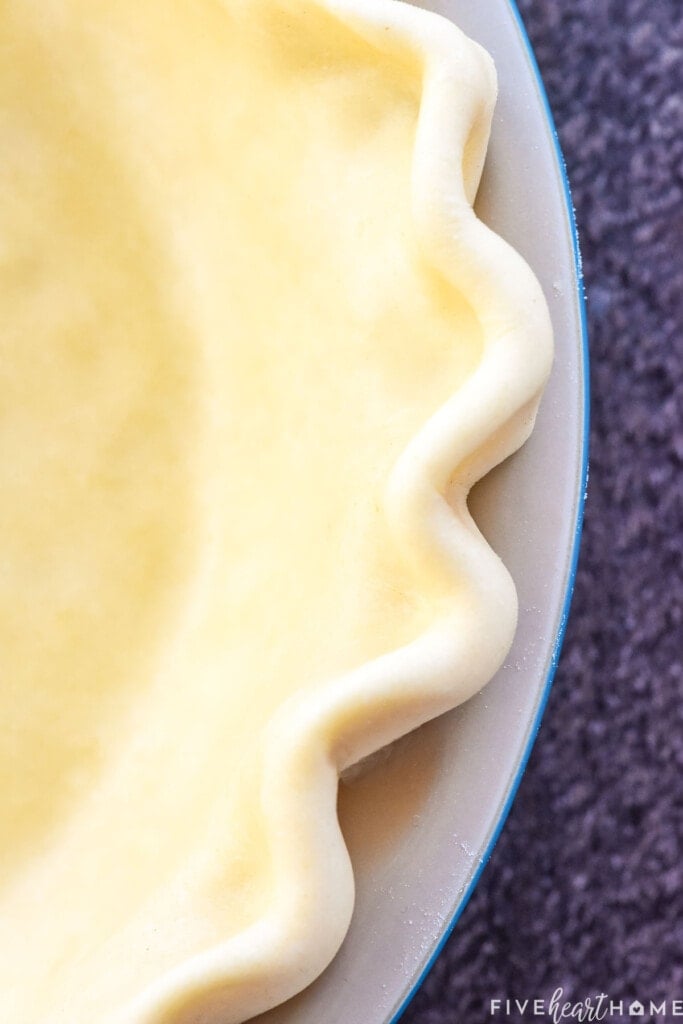
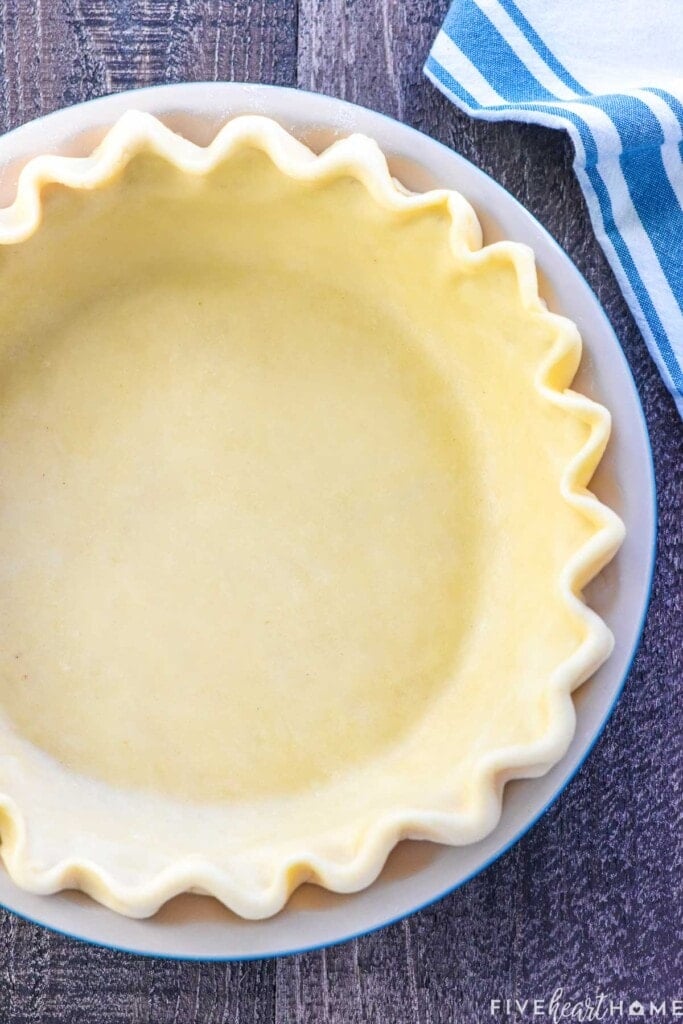
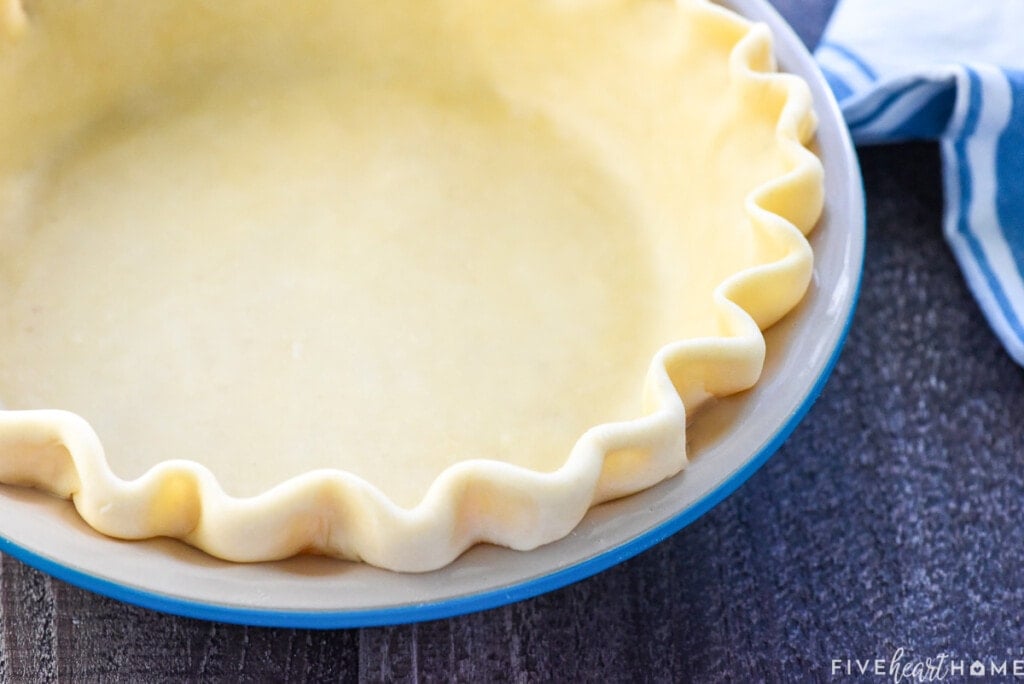
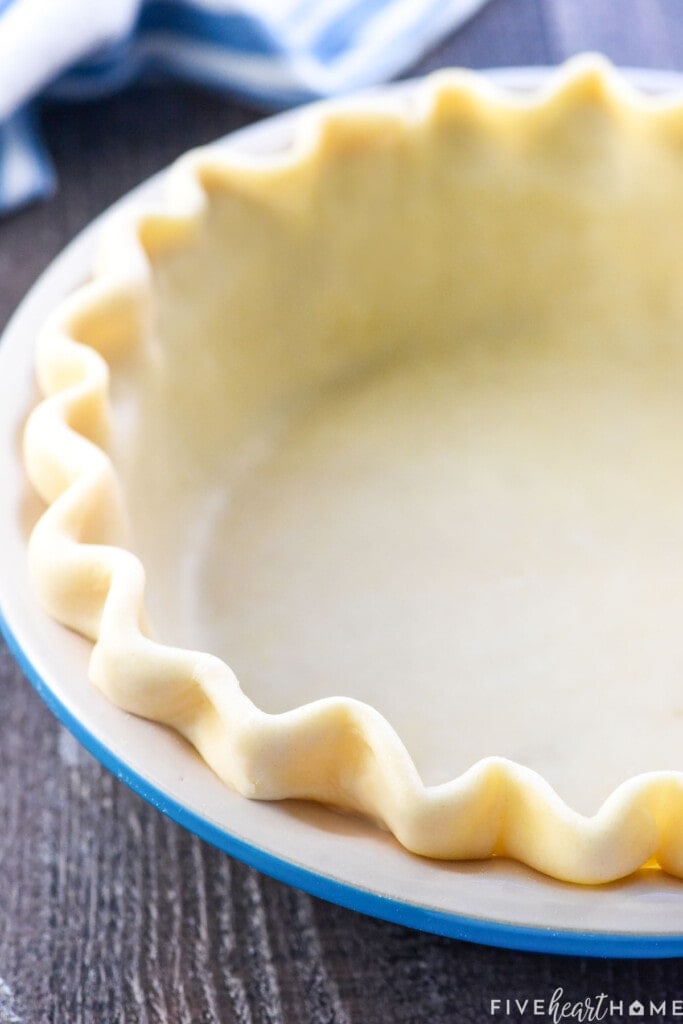
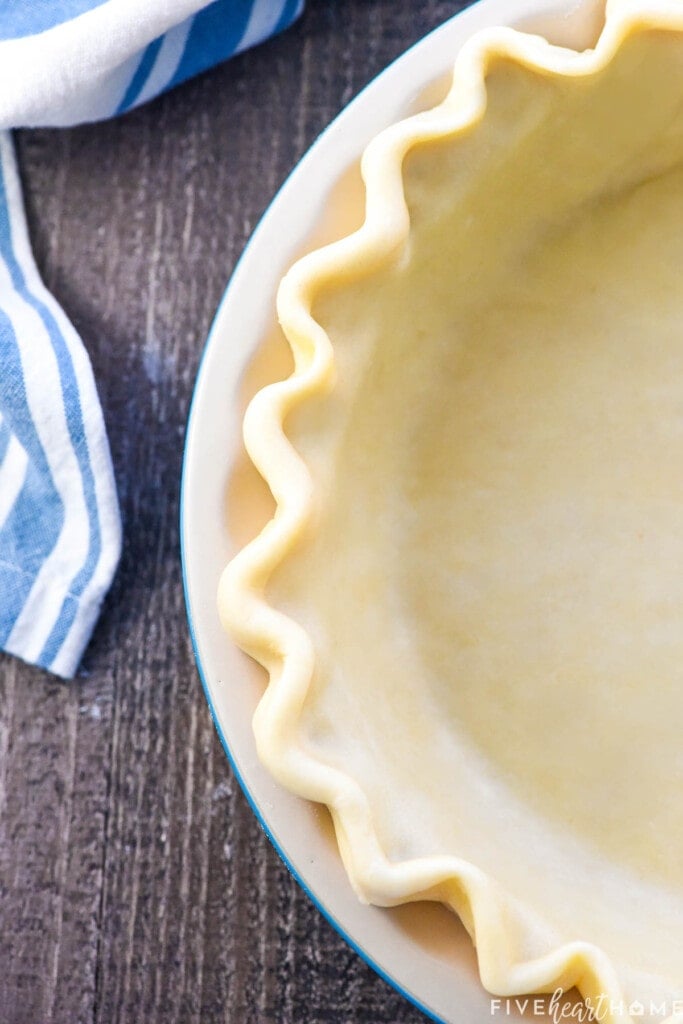
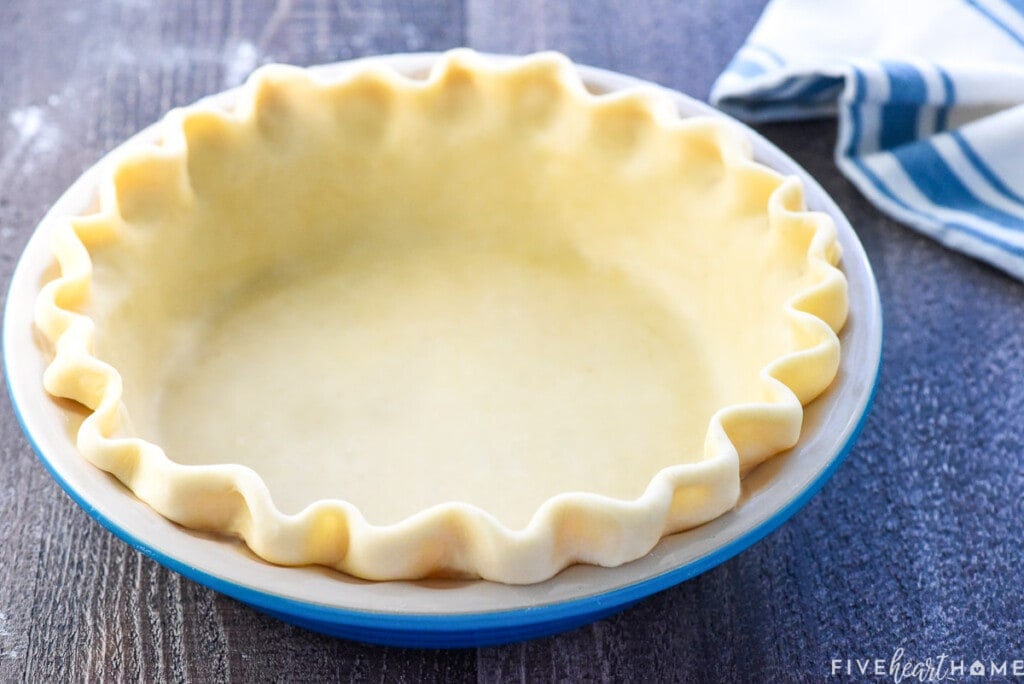
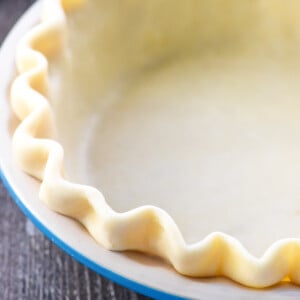
- Carefully lift the edges of the crust so that its center can be lowered into the corners of pan. Gently press the sides of the crust onto the sides of the pie plate and then fold under the overhanging crust so that the edge is thick and even.
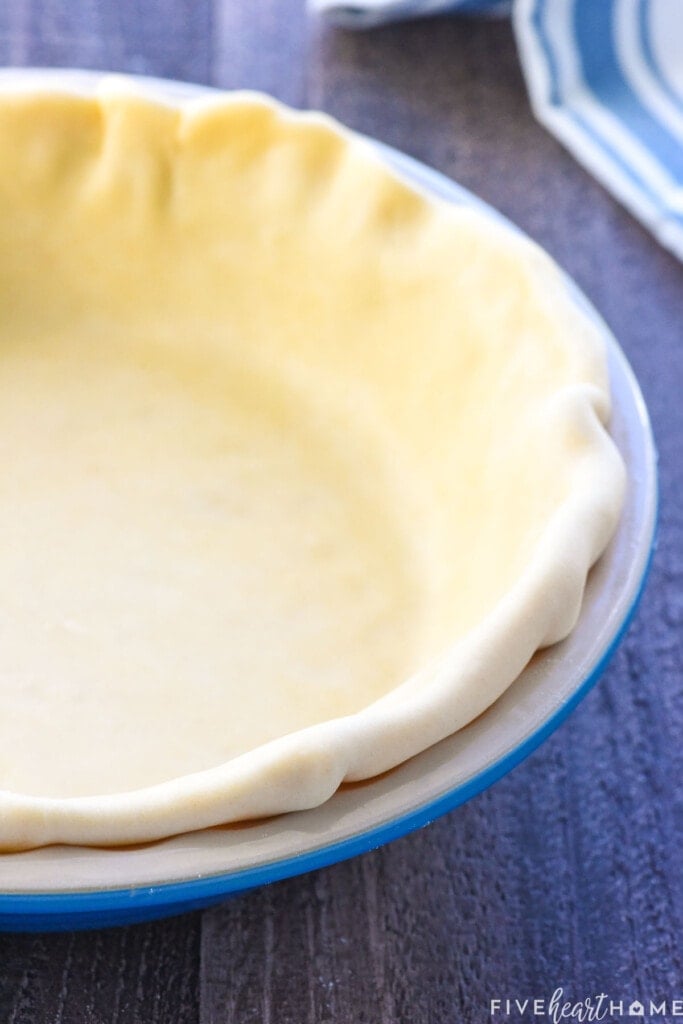
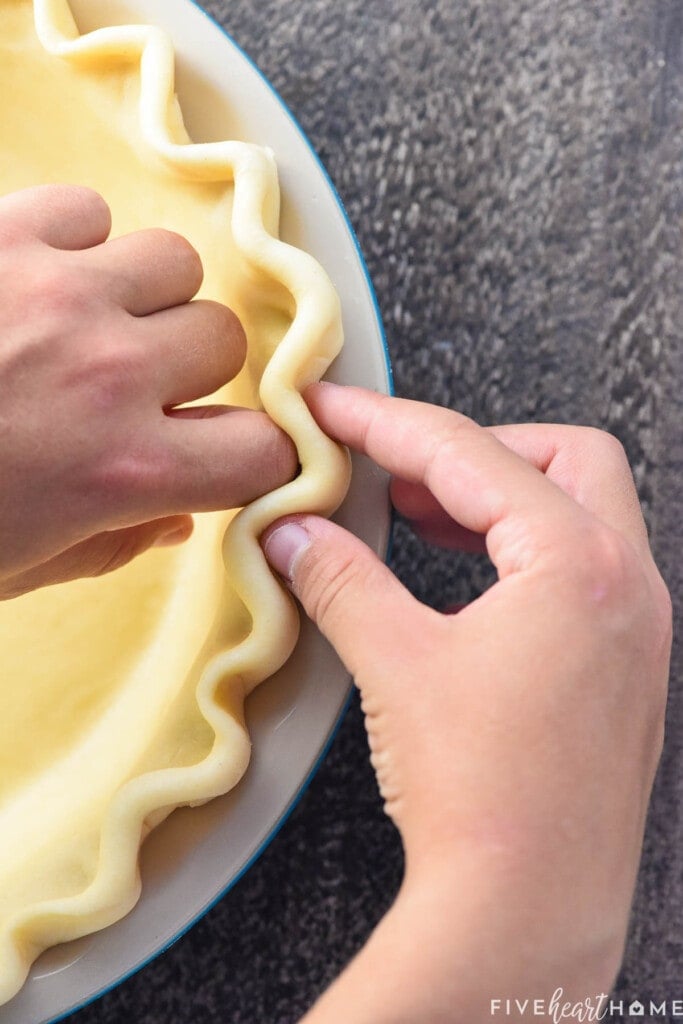
How to Flute a Pie Crust
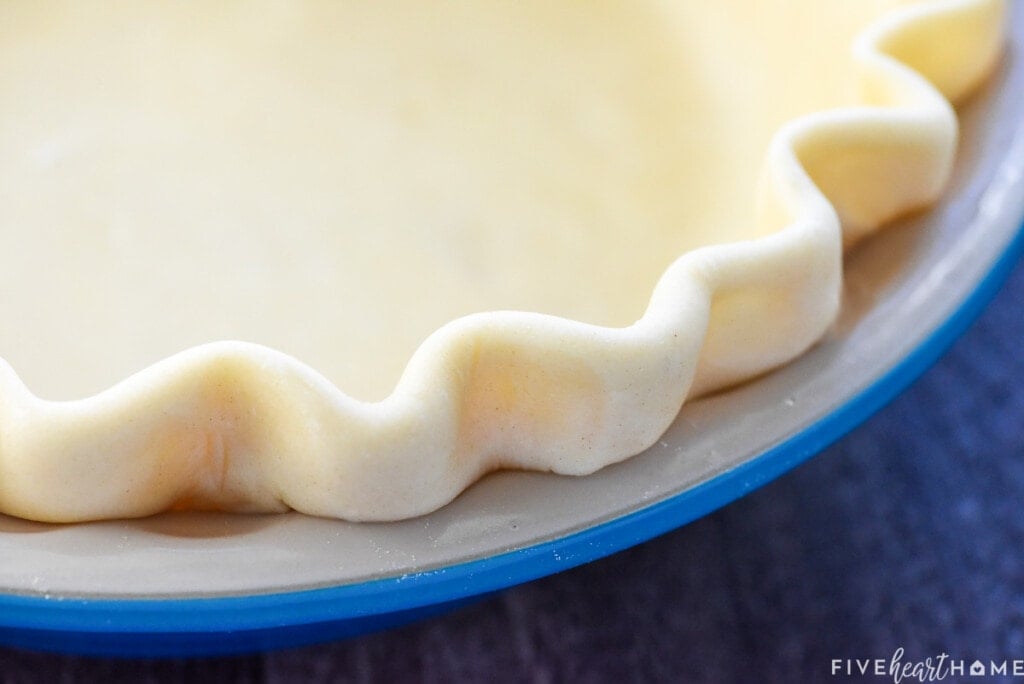
Now for the fun part! While you can absolutely leave the crust as-is, I highly recommend finishing the edges of the pie with your preferred decorative edge. I typically go for a fluted or crimped edge. It's easy to master and it's a classic!
- It's as simple as starting from the center of the pie and gently pushing a knuckle into the edge of the pie crust going outward.
- At the same time, use the forefinger and thumb of your other hand (coming from outside of the pie) to push the crust around that knuckle, thereby making a flute or "wave."
- Then move your knuckle down and repeat all the way around the pie.
As much as I wanted to demonstrate these steps for you in this post, I didn't have a third hand to hold a camera and take photos while using my (other) two hands. But lucky for me (and you!), I grabbed the nearest 10-year-old hand model to help me out! Not to worry...I later paid him in pie.
Alternatively, if you don't want to mess with fluting, you can instead crimp your Butter Pie Crust by pressing down all around the top edge with the tines of fork. Go slowly for even, parallel lines, and be careful not to press down too hard or you might tear the crust.
Now all you have to do is fill and bake your pie according to whatever recipe you're making!
Voilà! Can you believe it? Together, we just made a tender, flaky, buttery, homemade pie crust! That wasn't so bad now, was it?
Prebaked Pie Shell Directions
If you're making a pie recipe that calls for prebaking your pie crust, follow these additional directions once your crust is in its pie plate, with that pretty edge you worked so hard to create. 😉
- Refrigerate the pie plate for 40 minutes and then freeze it for an additional 20 minutes.
- While the dough-lined plate is finishing chilling, adjust an oven rack to its lower-middle position and preheat the oven to 375°F.
- Remove the pie plate from the freezer and line the shell with a large (about 15 inches long) double layer of foil. Press the foil into the corners and fold it over the top to shield the fluted edge.
- Pour ceramic or metal pie weights and/or dried beans into the foil-lined crust (I typically use a combo), filling it all the way to the top.
- Place the pie plate on a metal baking sheet, which will transfer heat gradually from the hot oven rack to the bottom of the cold pie plate in order to prevent shocking the glass.
- Put the pie plate-topped baking sheet into the preheated oven and bake the crust -- lined with foil and filled with weights -- for 25 to 30 minutes, until it looks dry and lightly colored.
- Remove the dish from the oven and carefully lift the corners to remove the foil and weights from the shell. Prick the crust across the bottom with a fork to keep it from bubbling up.
- Return the empty crust to the oven. For a partially baked crust, bake for 5 more minutes or until light golden brown. For a fully baked crust, bake for 12 more minutes or until deep golden brown.
Can I Freeze my Butter Pie Crust?
Aside from its simplicity, another bonus of this recipe is that it makes a double crust. So if you need two crusts for a pie, you're good to go. But if you only need a bottom crust, you have another whole crust to stash in the refrigerator or freezer until you're ready for it!
Wrapped in several layers of plastic wrap followed by foil or a freezer-thickness plastic baggie, a disk of this pie dough may be stored in the freezer for up to 3 months. I like to write the date on the wrapping with a sharpie to keep track of how fresh it is. Simply thaw in the refrigerator for a couple days -- and then allow to come to room temperature for a few minutes -- before rolling it out.
Troubleshooting
Sometimes, despite your best efforts, your beautiful Butter Pie Crust falls or shrinks while baking. There are a multitude of reasons why this can happen, so here are some tips to help prevent it!
- I said it once and I'll say it again...do not overwork the dough. 😉 An overworked, overly-firm crust is more likely to shrink.
- Roll out your crust to be large enough (even slightly oversized is fine)...don't try to stretch it into the pan. If you stretch it, it will shrink back when baking.
- Don't skimp on any of the resting times. After you mix up your crust and form it into a disk, it needs to be refrigerated for at least an hour. After you roll it out, let it rest for a few minutes before transferring it to the pie plate. And be sure the crust adequately chills once it's in the pie plate and before baking.
- Some people will argue that the type of pie plate you choose can affect the "grip" of your pie crust. I feel like there are pros and cons to using glass vs. ceramic vs. metal, and I typically choose ceramic. But no matter what type of dish you use, be sure that you really press the edges of your crust into the pie plate to help them stay in place.
- When you fill your pie with weights, fill it all the way to the top. The crust may slip down to the level of the pie weights if they don't reach the top edges.
- And finally, if you can avoid baking your pie at a high temperature, a more moderate oven temp (around 350°F) discourages shrinking.
The holiday season is right around the corner, and with it, many occasions calling for pie (yippee!). Just don't forget that this very best pie crust recipe happens to be just as good complementing a savory pie (think Chicken Pot Pie!) as a sweet one.
Even if you're already a pie crust professional, I think you'll enjoy this seriously flaky, melt-in-your-mouth, all butter pie crust. And if you've never attempted a pie crust recipe from scratch before, this is a great place to start.
You can do it! Pinky swear. And after you do, you'll see how easy it was and how buttery it tastes...and you'll wonder what took you so long to make your own homemade pie crust in the first place. 😉
More Sweet or Savory Pie Recipes
- Mini Pecan Pies
- Beef Pot Pie
- No-Bake Frozen Margarita Pie
- Impossible Cheeseburger Pie {without Bisquick!}
The Best EASY Butter Pie Crust (Foolproof...YOU Can Do It!)
Ingredients
- 1 cup (2 sticks) unsalted butter, cut into ¼-inch cubes and chilled
- 2 ¼ cups all-purpose flour
- 1 teaspoon salt
- 8 to 10 tablespoons ice water
Instructions
- Pulse the butter, flour, and salt in a food processor until the mixture resembles coarse sand, with some small lumps of butter (no larger than pea-sized) remaining. This will probably take 15 to 20 (1-second) pulses.
- Feed one tablespoon of ice water at a time through the feed tube of the food processor, pulsing 4 to 5 times after each addition. Stop adding water when the mixture begins to form large clumps and pulls away from sides of the food processor bowl.
- Dump the mixture onto a work surface and push it together into a big lump using your hands. Evenly divide the dough in half. Quickly form the halves into two balls and flatten them into 4-inch disks. Place each disk in a plastic baggie or wrap it in plastic wrap, and refrigerate for at least an hour and up to 4 days. Remove the dough from the refrigerator 3 to 4 minutes ahead of time so that it just starts to soften and is easier to roll.
- Lightly flour your work surface and rolling pin. Roll out the disk of dough from the center moving outward, turning it a quarter turn and repeating until the diameter of the whole crust is about 4 inches larger than the pie pan. If the edges of the crust start to split, pinch them together before continuing. Once the crust is rolled out, allow it to rest for 5 minutes.
- Carefully transfer the pie crust to the pie pan, flute the edges, and proceed with your pie recipe as directed. (To prebake your crust, see 'Notes' section below for directions. Further details can also be found in the post above the recipe card.)
Video
Notes
- Eight tablespoons of ice water is usually the perfect amount when I make pie crust, but you could require a tad more. Just pay attention to your dough and stop adding water before it gets too wet.
- Please see the photos and directions in the post (above the recipe) for information on how to fold and flute the edges of your pie crust.
- Remember...try not to handle the dough too much or your hands will warm it and start to melt the butter, resulting in a less-flaky crust.
- Tightly wrapped in several layers of plastic wrap followed by foil or a freezer-thickness plastic baggie, a disk of this pie dough may be stored in the freezer for up to 3 months. Thaw in the refrigerator for a couple of days before rolling out.
-
TO PREBAKE A PIE SHELL:
-
Refrigerate the dough-lined pie plate for 40 minutes and then transfer it to the freezer for an additional 20 minutes.
-
Place the oven rack in the lower-middle position of the oven and preheat the oven to 375°F.
-
Remove the pie plate from the freezer and press a double layer of aluminum foil into the pie shell, folding over the edges so that the entire crust is covered.
-
Fill to the top of the foil with pie weights.
- Place the pie plate on a metal baking sheet (which will transfer heat gradually from the hot oven rack to the bottom of the cold pie plate in order to prevent shocking the glass).
-
Put the baking sheet (with the pie plate on top) into the oven and bake for 25 minutes.
-
Take the pie plate out of the oven and carefully remove the foil and pie weights by lifting up the corners of the foil.
-
Prick the empty crust on the bottom with a fork, return it to the oven, and bake for 5 more minutes until light golden brown (for a partially baked crust) OR 12 more minutes until deep golden brown (for a fully baked crust).
-
Nutrition
Post originally published on October 21, 2013, and updated on October 25, 2019, August 1, 2020, July 23, 2021, and October 20, 2023.
this was amazing thank you!
I made this pie crust and it tastes fantastic and wonderfully flakey. However, the crust stuck horribly to the sides of the pie pans. I used my mother's pans that's she has literally baked hundreds of pies in without failure. I followed your instructions implicitly. Would you have any thoughts about what may have happened? I don't want to give up on this recipe.
Hi Bonnie! So sorry to hear about the sticking. That definitely shouldn't happen with all that butter! Is it possible that a bit of the filling leaked through and that's what was sticking? The only other common possibility I can think of is that perhaps the butter wasn't cold enough? Or maybe your mother's pie crust recipe included some shortening and behaves differently in those pans? I'm sorry I can't say for sure, but I do hope you can figure out the cause and achieve complete success with this recipe if you decide to give it another try. 🙂
I love and appreciate your directions! What size pie dish do you recommend so the crust doesn't end up too thin/thick?
The pie dish pictured in this post is a 9-inch Le Creuset, and that's the size I typically use when baking pies. 🙂
I love this crust. Fabulous tasting and EASY to make and rollout!!! Honestly easier than the ready made roll out pie crusts!!
the crust is the first crust I can make. the taste is great. It is my new and only pie crust from now on
It would be helpful if your recipe included the measurement for each ingredient. Your buttery pie crust lists flour, but not how much; butter but not the amount of butter, etc. Are we suppose to guess & are you making a single crust or double? Oh guess that depends on the amount of the ingredients & that we don't know! worthless post without all the info!
The recipe card at the bottom of the post -- just above where you left this comment -- provides a full ingredient list and recipe instructions. There is a "Jump to Recipe" button at the top of the post, and this info is also mentioned in the body of the post ("The below photos are intended to be helpful, but please refer to the recipe card at the bottom of this post for FULL DIRECTIONS") so as to help avoid confusion. 🙂
The pie crust baked up perfectly & looked incredibly flaky. I added an egg wash to it as well. I couldn’t help but try a little edge, and was shocked to taste that it was rather salty. Not crazy, but I’ve never had a pie crust turn out salty in all my years of baking them. I sure hope all my pies taste okay for Thanksgiving tomorrow. I will lessen the amount of salt to maybe 1/2 tsp next year. I don’t understand what happened. I also used the pastry blade in my food processor, and it didn’t work too well. So I went at it with my dough blender, and it worked out great. Next year I will use my regular blade as you stated in a comment above.
I’ve made this recipe twice and it turned out a crust easy to work with and tasty! I’ve sent the page to a friend to make, too. Thank you for sharing it.
Hi Samantha! I've made this crust twice now and it tastes absolutely amazing but I can't get my edges to hold their shape when I bake it. It looks beautiful before I put it in the oven then it begins to shrink and the edges fall. I have done all of the refrigerating that's recommended. Any additional tips?
Hi Tiffany! So sorry to hear that you're having a shrinking/sagging issue with your crust. There are lots of possible reasons, but perhaps it has to do with how you're rolling it out? This is a good article that explains that and other possible reasons for shrinking...hope it helps!
I've never had success with homemade pie crust until now! It looked beautiful and tasted even better. Thank you for the perfect pie crust recipe!
Ladies and Gentlemen, I am pleased to announce that I didn't change or modify this recipe for once in my life and it came out perfect. Surprisingly I made it first try! I often modify and mess it all up. This recipe is going in my recipe book!
Love this recipe! One change I made is to grate the butter, then chill it again before making my crust. It’s an extra step but perfectly dispersed butter every time.
I’ve made this pie crust and it is delicious, but I find that while it’s baking, it smokes so badly that once I open the oven door, the fire alarm goes off. Is it supposed to smoke so much?
Hi Connie! I'm sorry to hear that is happening. I've never had that issue with this recipe nor received a comment regarding this problem, but no, it should not smoke. However, there are a few possible culprits when an all-butter pie crust smokes. The most likely reason is that your oven is simply too hot. What is the directed oven temperature for the pie you are baking? If it's over 375°F, you might consider baking the pie at a lower temp for a bit longer. It could be that the crust wasn't cold enough when you popped it into the oven. Warm butter will reach the smoking point more quickly. Finally, if the edges of your pie crust are overhanging the pan, the melted butter could drip to the bottom of the oven and cause smoking. You can bring in the edges of your pie crust and put a sheet pan under your pie pan in the oven to alleviate dripping and, hence, smoking. Hope something in there helps and good luck if you try again! 🙂
This was so easy to make and delicious!
Prettiest pie shell I have ever seen. I truly thought you used some type of a tool other than your sweet 10 year old helper!
Awww thank you, Gwen...what a sweet comment! Let's just say I tried extra hard to make the pictured pie crust "pretty" since I knew I was going to be taking photos of it! Ha. 😉
I added 1 teaspoon of sugar and incorporated 1 teaspoon of white vinegar with the ice water. It rolled out easily and tasted great!
This is one of the easiest and flakiest pie crust recipes I've tried. Thank you
I made this the old fashion way without a food processor- went together like a dream only used 9 TBS of ice water & it was enough!!! Thank you!!!
I’ve always been told to add a bit of vinegar to hold the dough together. Seems by the reviews it isn’t necessary. I’m excited to try this recipe.
Hi Samantha! I’m not a baker, and I’m also very picky about the flavor and texture of pie crusts (many times they are just hard and flavorless and have no personality.) Given all that, I’ve never invested time in finding a recipe or trying to make it.
I used this to make hand pies with cherry filling and cooked them in the air fryer, and they turned out SO BEAUTIFULLY!! The crusts look like the crusts you see in magazines, the flavor is amazing, and the texture truly is light, flaky and even crispy in spots.
Thank you so much for taking the time to explain all of the steps and the reasons behind them. While using the food processor, chopping/freezing the butter, and the extra time in the fridge may seem like extra, they really did make all the difference in how these turned out. I’m going to use this recipe to make some savory pies this winter. 🙂
Of the many recipes I’ve prepared after doing a random internet search, this is the first one I’ve actually left a review for— I just wanted to make sure you knew how much your work was appreciated. Thank you!!
Kristina, how did you make your hand pies? Could you freeze them and put in the air fryer later?
This recipe is my absolute favorite for an all butter pie crust! Thank you for sharing.
If you are making the crust to immediately use, does it still need to be chilled for an hour first?
AND, it you are making it to immediately Pre-bake, do you let it chill in the 4-in disc first and then also chill it in the pie plate as per the pre-bake instructions, or could I roll it out immediately and then chill it in the pie plate?
Sorry, very new to making pie crusts
Hi Anna! (1.) Yes, you need to chill the crust for an hour before rolling it out. (2.) And yes, to pre-bake, you should chill as a disk for an hour, and then roll out and chill in the pie plate again. I know there's a lot of chilling, but I promise it's worth it! 🙂
I rolled it.. put it in the pie dish and just put it in the fridge until I made the pumpkin filling. Came out perfect.. did not burn at all or get dark. So good. Wrote it for my recipe box
Hi. Can’t wait to try this. For pecan pie, should I be pre baking this pie crust? Or partially? Or not at all and just bake with the filling? I’ll come back and rate after I make it next week!!
Hi there! Your pecan pie recipe should specify what to do with the crust. 🙂 My pecan pie recipe has you pre-bake the crust, but some don't! Does your particular recipe provide direction?
could use this crust for tart shells?
This pie crust should definitely work in tart pans, but keep in mind that it's going to taste different than a true tart dough recipe, which is typically lightly sweet and slightly crumbly.